Open Ticket
  +373 79 600002
  Telegram Live Chat
  F.A.Q
F.A.Q  English
 Русский
  Română
  Deutsch
  Français
  Türkçe
  Español
  Português
  Українська
  български
  Polski
  Indonesia
  中文 (中国)




































































































































 on All Hosting Services









DiskTree Explained: Visualizing What Eats Your Storage
When “Disk Full” Does Not Tell You What Matters
Free space rarely disappears into one tidy folder. Package caches and build output may occupy one branch of a development machine. Downloaded media, application logs, and old repositories may sit in others. A capacity warning confirms the pressure, but not which branch deserves attention first—or whether its contents are disposable.

A numeric listing can answer that question, but comparing paths and totals takes concentration. A spatial map provides another view: one oversized region stands out against the smaller ones, so the first task becomes prioritization rather than arithmetic. The numbers still matter. The map makes their proportions easier to see.
That view helps Linux desktop users and developers, as well as operators deciding whether a graphical storage tool belongs on a hosted machine. This guide explains DiskTree’s visual language, its documented Linux starting paths, and where it does—and does not—fit. First, the crowded directory tree needs a map.
What DiskTree Is—and What It Is Not
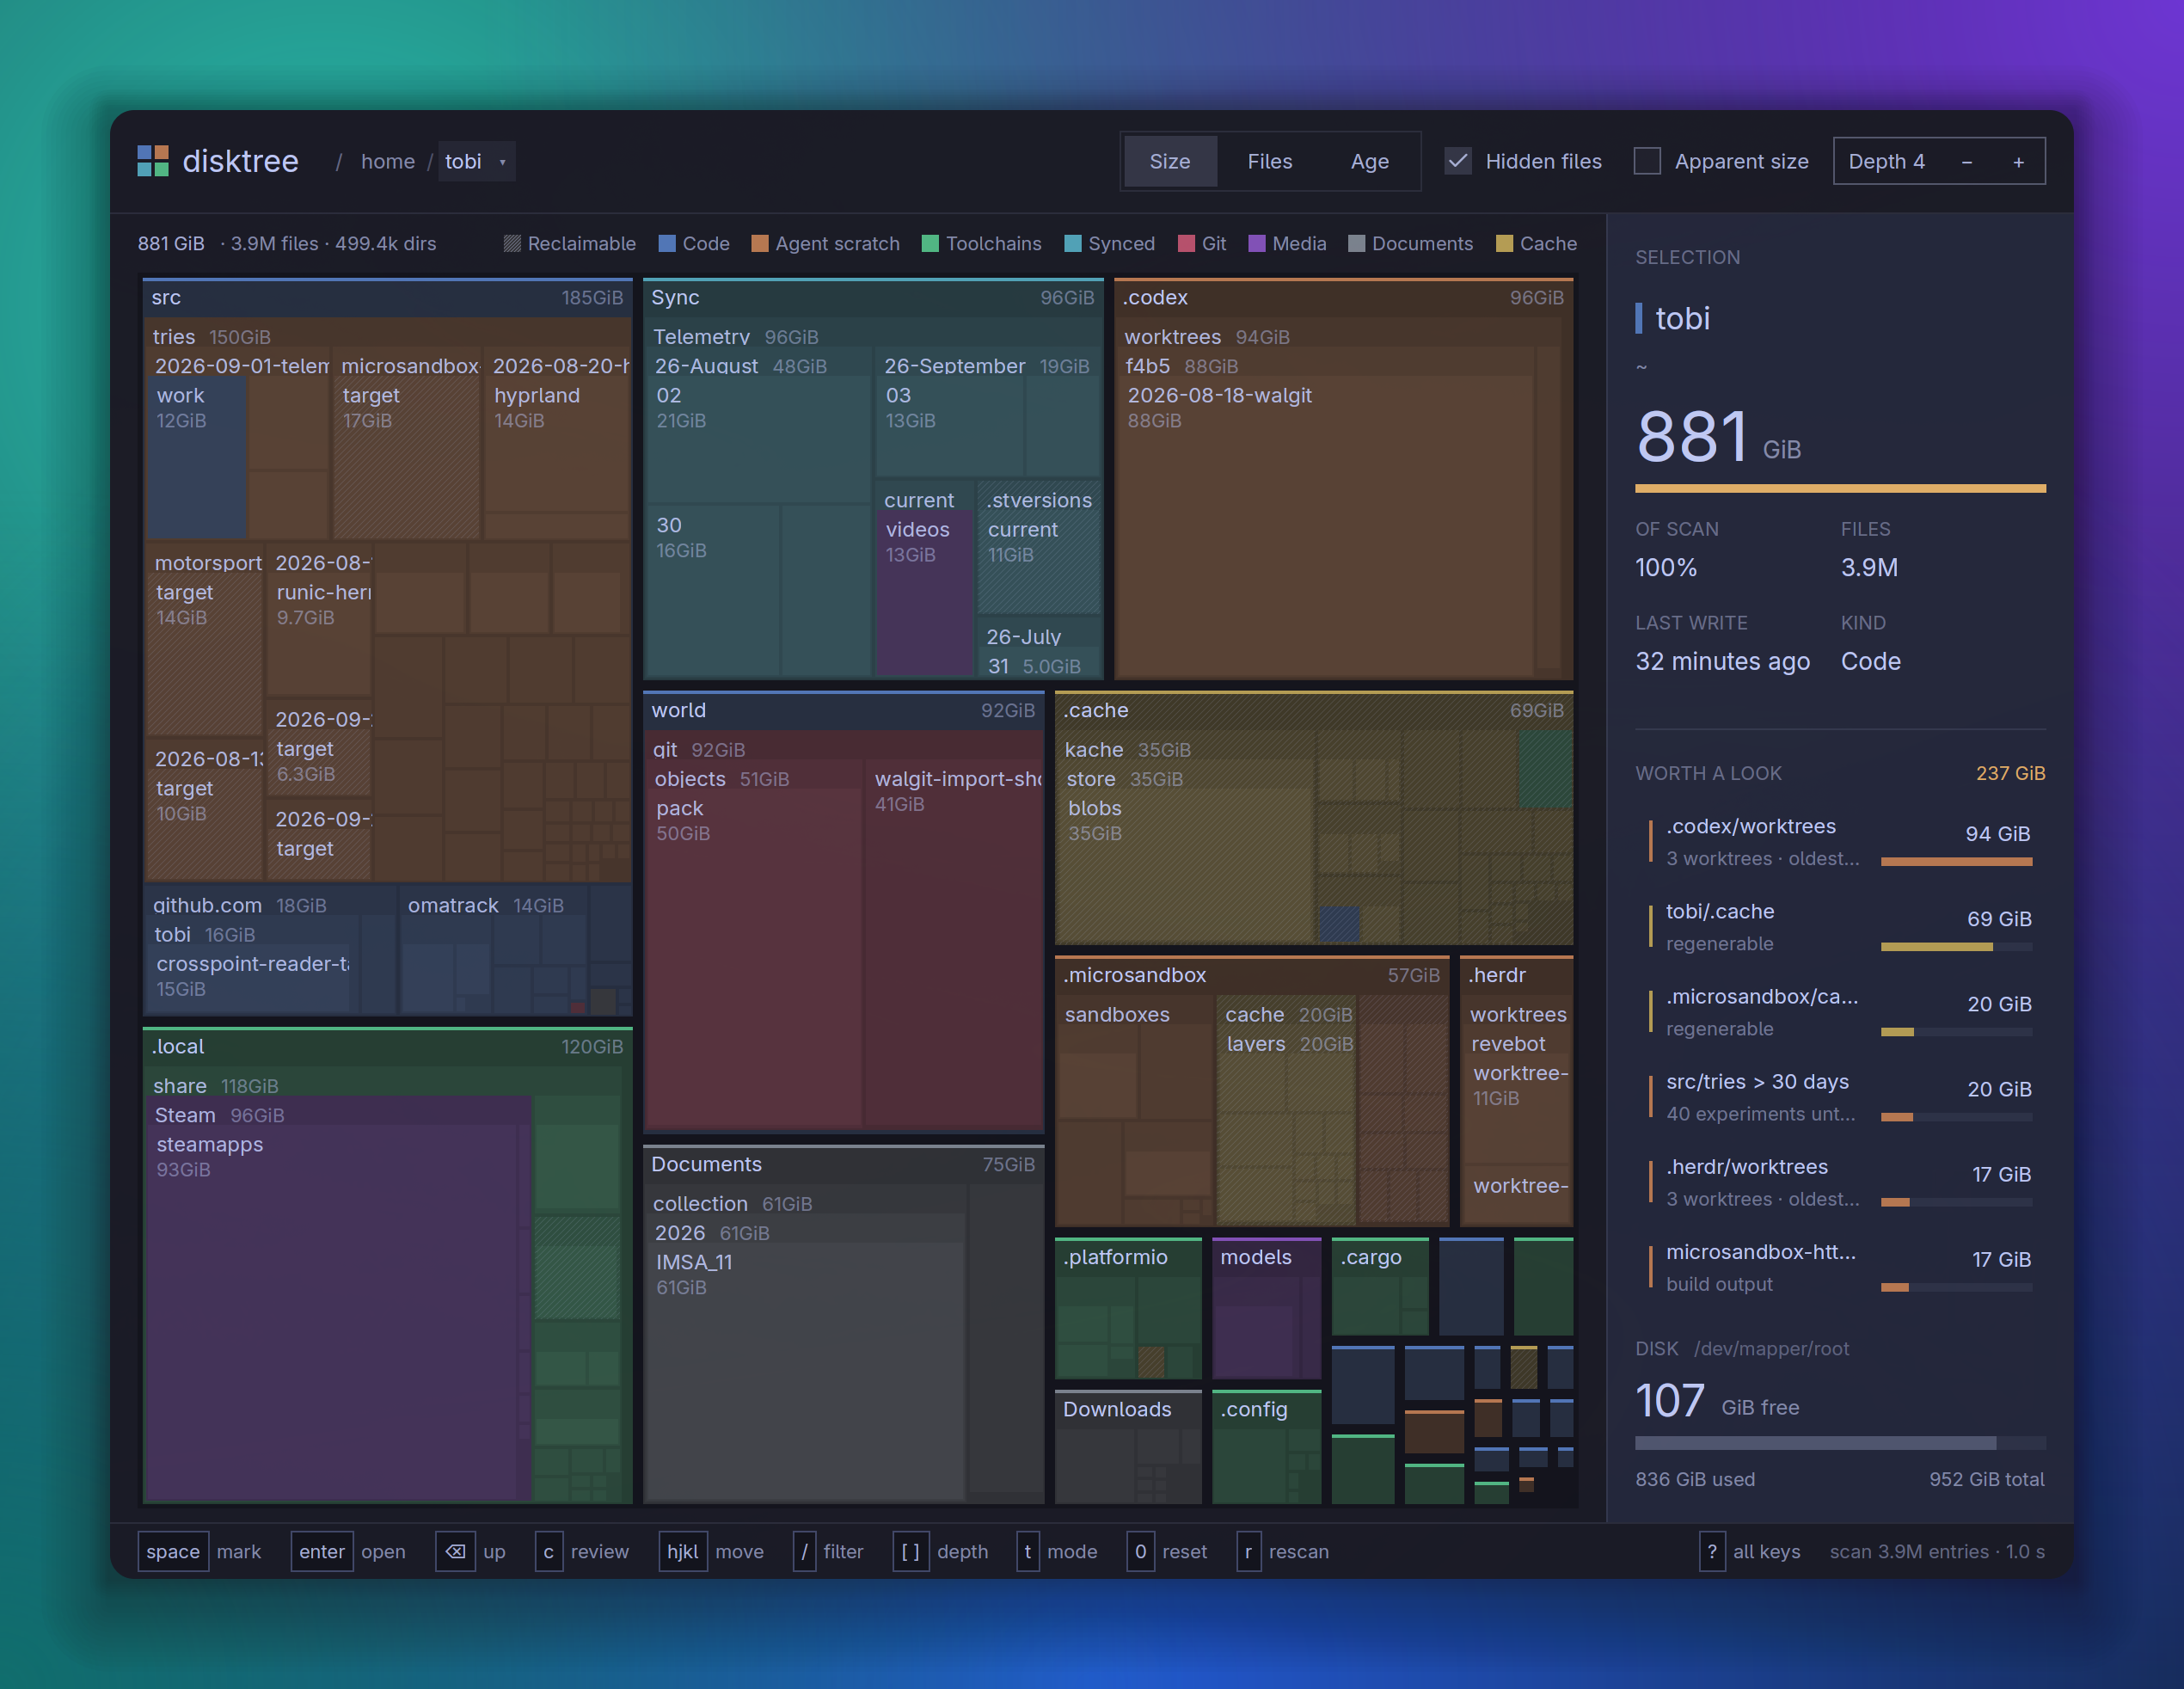
DiskTree is a graphical disk-usage application that turns a directory tree into a treemap: a nested mosaic in which area communicates storage use. Instead of reading one folder total after another, you can see which regions dominate. From there, you can navigate into them and build a shortlist for closer inspection.

Created by Tobias Lütke, the tobi/disktree project is MIT-licensed and written in Rust. It uses the GPUI graphical framework through gpui-omarchy. Omarchy is its original desktop context, but release v0.10.1 includes Linux, macOS, and Windows builds. This guide stays focused on Linux.
DiskTree first scans and visualizes storage. You can then navigate the map and mark candidates for a separate review. Only after that review can selected items be moved to Trash or removed permanently. This sequence separates discovery from commitment: the interface organizes what to inspect. The user still identifies who owns the data and why it matters. They must also decide whether it can be recovered.
📝 Note: This article bases its descriptions on v0.10.1, published September 25, 2026. Because the project is moving quickly, check the latest release and its tagged documentation before following version-sensitive instructions.
How to Read the Treemap
Think of the scan root as a warehouse. Directories are rooms that can contain smaller rooms, while files occupy floor space inside them. Zooming into a directory is like walking into one room: the view gains detail without changing the hierarchy. The interface renders these rooms as nested rectangles, making their proportions visible.
                  WAREHOUSE = SCAN ROOT
                       /home/user
┌─────────────────────────────────────────────────────────────┐
│                                                             │
│  projects/ [BLUE]                     media/ [GREEN]         │
│  ┌────────────────────────────────┐  ┌───────────────────┐  │
│  │                                │  │                   │  │
│  │  build/                        │  │  videos/          │  │
│  │  ┌──────────────────────────┐  │  │                   │  │
│  │  │ / / / / / / / / / / / /  │  │  │                   │  │
│  │  │ / / Worth inspecting / / │  │  │                   │  │
│  │  │ / / / / / / / / / / / /  │  │  │                   │  │
│  │  │ / / / / / / / / / / / /  │  │  │                   │  │
│  │  └──────────────────────────┘  │  └───────────────────┘  │
│  │                                │                         │
│  │  src/                          │  .cache/ [PURPLE]       │
│  │  ┌──────────────────────────┐  │  ┌───────────────────┐  │
│  │  │ Source files             │  │  │ / / / / / / / / / │  │
│  │  └──────────────────────────┘  │  │ / Inspect first / │  │
│  │                                │  └───────────────────┘  │
│  └────────────────────────────────┘                         │
│                                                             │
└─────────────────────────────────────────────────────────────┘

        ZOOM → Walk into a room to see its contents.
In the default Size view, tile area represents allocated disk usage. On Linux, DiskTree calculates this as st_blocks × 512, aligning with du and generally reflecting reclaimable space better than logical length. Apparent size is that logical byte length—the value shown by ls -l—and is available as a separate toggle.
❗ Important: A DiskTree total can differ from the byte length shown by ls -l without either being wrong. Confirm whether Size or Apparent size is active before comparing totals.
Color adds another layer.
- Broad colors identify content kinds, while lighter shades indicate deeper nesting.
- Diagonal hatching marks potentially reclaimable content, such as some caches or build output.
- Amber highlights selections, primary actions, or reclaimable space according to context.
These classifications are heuristic: hatching narrows the inspection area but does not settle the decision.
Several filesystem rules affect the totals. DiskTree includes hidden entries by default, so directories such as ~/.cache are not omitted. It does not follow symlinks—references to other paths—by default, and it counts hardlinked data only once even when several names point to it. See the tagged README’s “What it measures” section for implementation details.
The interface places the breadcrumb trail and view controls at the top. Scan totals, the active filter, and the legend sit directly below. The mosaic occupies the main area. The side panel shows the current selection and “Worth a look” candidates. It also tracks marked items and compares current with projected free space. A breadcrumb is the path trail that shows your location and lets you move up or sideways through the hierarchy.
Before Installing: Check Whether Your Environment Fits
DiskTree’s Linux build has three practical gates:
- Choose the release archive for the machine’s architecture: x86_64 or aarch64.
- Run it inside a Wayland or X11 graphical session—the Linux display systems through which desktop applications open windows.
- Use graphics that GPUI can drive through Vulkan, the graphics interface required by the application’s UI stack.
A local graphical Linux desktop commonly provides the display session, although graphics compatibility still matters. A remote-desktop machine may also provide one, but its image and graphics stack need confirmation. A standard VPS reached only through SSH is different: shell and root access do not create a display session or compatible graphics.

❗ Important: Root access solves permission problems; it does not supply a graphical session or compatible graphics. If the machine is SSH-only, stop here and continue to Where DiskTree Fits—and Where It Does Not instead of installing DiskTree.
The prebuilt archive needs no Rust toolchain. Rust 1.97 or newer applies only to source builds. Once architecture, display, and graphics support are confirmed, the prebuilt release is the least burdensome documented route.
The Simplest Documented Installation Paths

For the beginner path, open the latest GitHub release and choose the x86_64 or aarch64 Linux archive. Unpack it, then enter the extracted directory. From there, run the bundled installer:
./install.sh
By default, the script installs ~/.local/bin/disktree without root access and adds a desktop entry and icon under ~/.local/share.
If the installer reports that ~/.local/bin is missing from the current shell’s PATH, the desktop entry may still work. Until you update the shell configuration, use the binary’s full path:
~/.local/bin/disktree
This should open DiskTree when the graphical requirements are present; it does not change the shell’s PATH permanently.
On Arch or Omarchy, the Arch User Repository offers a shorter route. With an AUR helper already configured, install the user-maintained disktree-bin package:
yay -S disktree-bin
This installs the DiskTree version currently packaged in the AUR.
📝 Note: AUR packages can lag upstream releases. On September 28, 2026, disktree-bin was still listed as 0.10.0-1, while GitHub’s latest release was v0.10.1. Verify both pages before describing the package as current.
Building from source is the advanced alternative and requires Rust 1.97 or newer. The following commands clone the repository and run its install target:
git clone https://github.com/tobi/disktree
cd disktree
make install
This compiles DiskTree locally and installs it under ~/.local by default. The release archive avoids this build step.
Four Ways to Start DiskTree

These commands are alternatives, not a sequence. Except for –help, they open a graphical window rather than produce a terminal report. To use the default scan root—the top directory DiskTree inspects—start the application without a path:
disktree
DiskTree should open an interactive window with the user’s home directory as the scan root.
For a bounded first look, give DiskTree a directory you own and understand. This example uses ~/.cache, which you can replace with another path:
disktree ~/.cache
The resulting window is limited to that tree, making the visual grammar easier to learn.
To widen the scope to the volume containing the home directory, use the documented disk option:
disktree --disk
This does not mean “scan every disk.” The scan normally stays on one volume and excludes other mounts and pseudo-filesystems. Unreadable directories are reported rather than estimated. The result is broader than a focused scan but does not account for every mounted location.
For the current option reference, ask the installed version for help:
disktree --help
Unlike the scan commands, this prints the current options in the terminal—more reliable than a copied flag list as the project evolves.
From Big Blocks to a Cleanup Shortlist
Start with the focused directory and assess proportion before considering removal. The largest region shows where most of the scan root’s allocated usage sits, not why the data exists. It may represent a cache or build directory. It could instead contain downloads or an old project. Move into the region with the scroll wheel, or select it and press Enter.

Use the breadcrumb trail to retain context as you move deeper. It shows the path from the scan root to the current view and lets you jump to a parent or sibling. Press Backspace or Esc to go up one level. An oversized subdirectory can look very different once its parent application or project becomes clear.
If the mosaic is crowded, press / and type part of a name to highlight matches. This filter neither changes the scan root nor removes anything. Start the side-panel review with the selected path and its size or share. Then check the file count and last-write information. For a Git checkout, the panel may also show changes, stashes, or unpushed commits. Those details can turn an apparently old directory into unique work.
“Worth a look” is best used as a navigation queue: it brings large, plausibly reclaimable items into view so you can check their context in the treemap and side panel. Once a candidate belongs on the shortlist, use Space or X to mark it. The projected free-space figure updates, but removal still waits for review.
Press c when the shortlist is ready for review. Use ? for the complete key reference instead of memorizing every control. At this point, the workflow moves from exploration toward an explicit commit choice:
Reversible inspection
Choose scope → Scan → Inspect/zoom → Mark → Review projected free space ⚠ → Commit
Trash / delete → Verification
Rescan
Marking Is a Preview; Removal Is a Separate Decision
Marks remain editable. If you mark a parent directory, DiskTree absorbs marks already inside it, and children within that parent cannot be separately kept or counted again. This prevents nested entries from inflating the projected free-space figure, which is based on marked allocated usage.

The review screen is the commitment checkpoint. Inspect every path, unmark anything uncertain, and compare current free space with the projected post-removal figure. Ask four questions:
- Which application or project owns this data?
- Have you confirmed that it can be regenerated?
- Does a repository contain changes, stashes, or unpushed work?
- Is there a usable backup, and would the owning application’s cleanup tool be safer?
⚠️ Warning: “Worth a look,” hatching, or a mark identifies a candidate—not permission to remove it. Caches may be regenerable, while repositories can contain unique work. Package stores, journals, and managed caches may be better cleaned through their owning tools.
The two commit choices are materially different. Move to Trash is intended to keep items recoverable until Trash is emptied, but Trash is not a backup. Delete permanently has rm -rf semantics and requires explicit confirmation. DiskTree then rescans and reports the actual free-space gain, which may differ from the projection.
The project also documents refusal guards for high-risk targets. DiskTree refuses the filesystem root, the scan root, and the user’s home directory. It also protects mount points, directories containing them, and named system trees. Symlinks are unlinked rather than followed. These controls reduce obvious hazards; they do not make arbitrary removal safe. See the tagged documentation’s “What it refuses to do” section for the current list.
Where DiskTree Fits—and Where It Does Not
DiskTree fits Linux workstations and developer machines where spatial exploration clarifies storage proportions. Omarchy or Arch desktops fall naturally into that group. A compatible remote graphical session may also work. The table contrasts these environments with headless machines, which lack a graphical desktop session, and with automated jobs.
The environment decision is straightforward:
| Environment | Fit | Reason / next direction |
|---|---|---|
| 🖥️ Local graphical Linux desktop | Good conditional fit | Confirm the architecture and Vulkan support, then use DiskTree for interactive inspection. |
| 🐧 Omarchy/Arch desktop | Good conditional fit | It matches the project’s original workflow, subject to graphics and package-version checks. |
| 🌐 Compatible remote graphical session | Possible fit | Confirm Wayland/X11 and Vulkan support on the exact image before relying on it. |
| ⌨️ Standard SSH-only VPS | Poor fit | Use a terminal-native disk-usage workflow instead of adding a desktop for one analyzer. |
| ⚙️ Automation or non-interactive jobs | Poor fit | Choose scriptable reporting and cleanup controls rather than a GUI review flow. |
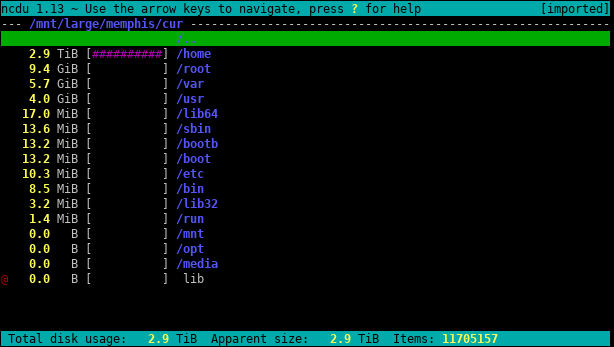
For shell-only systems, du provides the ubiquitous command-line baseline. dust presents disk usage in a modern tree-style view, while ncdu offers an interactive terminal browser. All three match the access model without requiring a graphical stack.
| Dust | Ncdu |
|---|---|
|
|
| Source: Dust project demo, GitHub. | Source: Ncdu screenshots, official Ncdu website. |

📝 Note: An AlexHost Ubuntu Remote Desktop VPS falls into the right hosted category because it provides graphical access.
Choose DiskTree for spatial inspection through a compatible GUI. Choose a terminal-native path when access is shell-only or the workflow must be automated.
A Map Before a Delete Button
A full-disk warning need not lead directly to the first large item. Instead, map proportion, inspect ownership and context, mark candidates, review the consequences, commit deliberately, and rescan. DiskTree is a map and decision aid, not an automatic verdict about safe deletion.
If that workflow fits, start with the latest GitHub release and official README because the project is changing quickly. Whether storage is local or hosted, choose a diagnostic tool that matches how you access the machine.