Open Ticket
  +373 79 600002
  Telegram Live Chat
  F.A.Q
F.A.Q  English
 Русский
  Română
  Deutsch
  Français
  Türkçe
  Español
  Português
  Українська
  български
  Polski
  Indonesia
  中文 (中国)




































































































































 on All Hosting Services






Linux Users, Groups, and Permissions: One Practical Onboarding Workflow
The Monday-Morning Access Request
Monday morning, a new teammate joins your project and needs access to the shared development workspace on your Ubuntu VPS today. They should be able to log in, open the team directory, and do normal work without waiting on someone else for every small task. They should not get root access. They should also stay out of the restricted release-secret area.

That is where Linux users, groups, and permissions stop feeling like three separate textbook topics and start acting like one practical system. Maybe the server lives on an AlexHost VPS, maybe it lives somewhere else, but the access question is the same everywhere: how do you give useful access without giving full control?
This walkthrough follows that one onboarding request from start to finish, so every command has a clear job and place in the story. If terms like user, group, and permission have ever felt fuzzy on their own, this is the easiest way to make them click together.
Workflow:
user account → group membership → ownership alignment → permissions → verification
One Mental Model Before Any Commands
Before any commands, keep one analogy in your head: think of the server like an office building. A user is the named badge for one person. A group is the department they belong to. Permissions are the door rules on rooms and cabinets. Linux access gets much easier once you read it that way instead of memorizing isolated commands.
The three core questions are simple:
- A user answers, “Who is this?”
- A group answers, “Which shared team are they part of?”
- Permissions answer, “What can they do here?”
That is also the heart of least privilege: give someone exactly enough access to do the job, and no more. Permissions alone never solve the whole problem, because the right rule on the wrong identity or wrong team still produces the wrong result.

The same logic appears on every file and directory. Linux first checks whether you are the owner, whether you match the path’s group, or whether you fall into others — meaning everyone else on the machine. Only then does it apply the relevant rule. That is why the same path can behave differently for different users.
The compact translation table below is enough for the rest of this article:
| Linux term | Plain-English meaning | Question it answers |
|---|---|---|
| 👤 user | A named account for one person | Who is this? |
| 👥 group | A shared team membership | Which team are they in? |
| 🔑 owner | The user attached to a file or directory | Who is this path assigned to first? |
| 📁 group (on a path) | The team attached to that path | Which team gets the shared rule? |
| 🌐 others | Everyone else on the machine | What can everyone else do? |
📝 Note: The commands below use Ubuntu-friendly examples, but the mental model itself applies across Linux generally.
From there, the first step becomes obvious: before Maya can share anything with the team, the system needs to know she exists as her own person.
Step 1: Create the Person on the System
A Linux user account is not just a label in a list. It gives Maya a login identity, a home directory, and a separate working context from everyone else on the server. That separation is what makes accountability possible. If something changes, you can tell who changed it. If access needs to stay narrow, you can scope it to one real account instead of a shared mystery login.
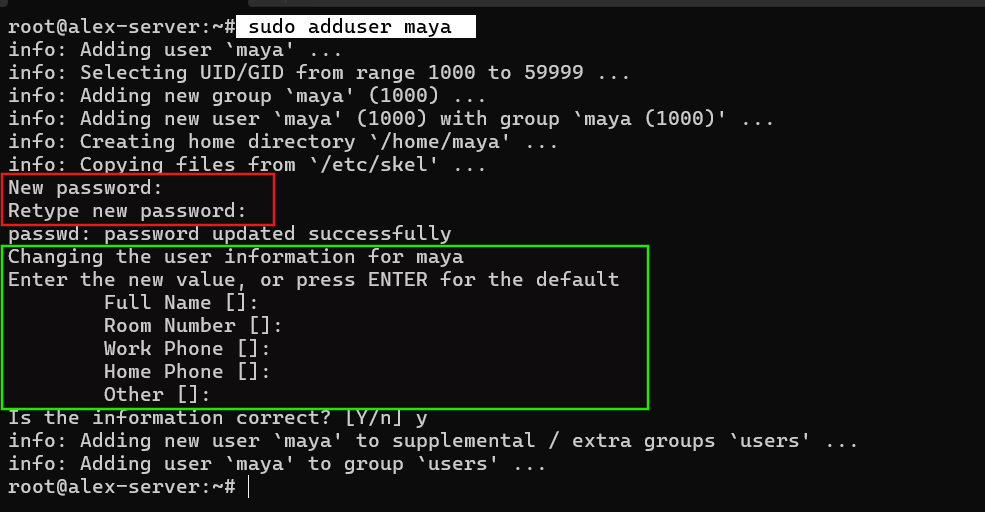
On Ubuntu, the human-friendly way to create that account is:
sudo adduser maya
Ubuntu will walk you through the normal setup and usually create /home/maya at the same time. You may also see useradd in scripts or lower-level documentation. On Debian/Ubuntu systems, adduser is usually the friendlier choice for a normal human account.
This is also why shared accounts are such a bad habit. If multiple people all log in as the same user — or worse, “just use root” — you lose traceability immediately, and every later permission decision gets sloppier. A user account answers who Maya is. It does not yet answer what shared project space she can use.
Step 2: Put Them in the Right Team
Now Maya exists, but she still has no relationship to the shared workspace. That is where groups become useful. A primary group follows the account by default. Supplementary groups are the extra teams you attach to a user so shared access scales cleanly across multiple people and multiple projects.
If your project group does not already exist, create it first. Then append Maya to that group instead of replacing her existing supplementary memberships.
⚠️ Warning: usermod -G devteam maya without -a can replace Maya’s existing supplementary groups. The -a flag means “append,” and it is the part that keeps this safe.
Use the following commands to create the group and verify Maya is part of it:
sudo groupadd devteam
sudo usermod -aG devteam maya
id maya
If devteam already exists, skip the groupadd line. In the id output, you want to see devteam listed among Maya’s groups:

That output proves the team membership is there. It does not yet prove Maya can use the workspace. Being in devteam still does nothing if the directory itself is owned and grouped in a way that ignores that team.
Step 3: Match Ownership to the Workspace
This is the missing link behind a lot of beginner frustration. The next question is about the workspace itself: who owns it, and which group is attached to it? Until that is aligned, Maya’s correct team membership has nowhere useful to apply.
For this walkthrough, use one shared path and one restricted path. The shared team area will be /srv/devworkspace. The private area will be /srv/release-secrets, with one example file inside it. Create both paths first:
sudo mkdir -p /srv/devworkspace /srv/release-secrets
sudo touch /srv/release-secrets/deploy-key.txt

Next, inspect what those paths currently look like:
ls -ld /srv/devworkspace /srv/release-secrets
ls -l /srv/release-secrets/deploy-key.txt
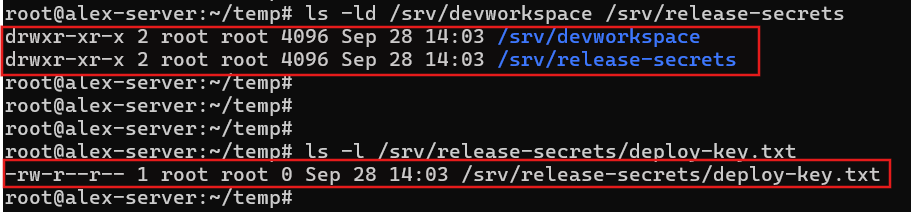
The -d matters here because it tells ls to describe the directory itself instead of listing its contents. In the long listing, start with three pieces. Look first at the permission string on the left. Then check the owner and the group. If both paths still show root root, Maya’s new devteam membership has nothing useful to connect to yet.
If you only needed to change the group, chgrp devteam /srv/devworkspace would do that. Here, chown owner:group is clearer because it sets the full target in one line. The shared workspace should belong to root:devteam, while the restricted path should stay root:root:
sudo chown root:devteam /srv/devworkspace
sudo chown root:root /srv/release-secrets /srv/release-secrets/deploy-key.txt
After that ownership alignment, the important parts of the listing should read like this:
drwxr-xr-x  root devteam  /srv/devworkspace
drwxr-xr-x  root root     /srv/release-secrets
-rw-r--r--  root root     /srv/release-secrets/deploy-key.txt

permissions  owner  group
💡 Tip: Keep restricted secrets outside the group-writable workspace. That keeps the setup easy to reason about and avoids messy directory-write edge cases that are not helpful in a beginner onboarding flow.
At this point, ownership tells Linux whose area each path is attached to. The final step is to define what that owner, that group, and everyone else can actually do there.
Step 4: Set Permissions That Match the Job
With ownership aligned, you can now set the actual rule for each path: who may read it, change it, or enter it. Think job first, numbers second. You are not trying to memorize the whole permission universe here; you are expressing one practical rule for one shared workspace and one restricted secret area.

The small matrix below is the only one most beginners need:
| Permission | On a file | On a directory |
|---|---|---|
| r | Read the file contents | List the names inside |
| w | Change the file contents | Create, rename, or delete entries inside |
| x | Run the file as a program or script | Enter/traverse the directory |
The directory row is the trap. On a directory, x does not mean “run the folder.” It means you can enter that path or traverse through it on the way to something deeper. That is why a file can look readable in theory and still fail in practice if you cannot cross the directory path that leads to it.
Now apply the rules that match this onboarding story. The team workspace should be usable by root and devteam, but closed to everyone else. The secret directory should stay root-only, and the secret file inside it should stay root-readable only:
sudo chmod 770 /srv/devworkspace
sudo chmod 700 /srv/release-secrets
sudo chmod 600 /srv/release-secrets/deploy-key.txt
Those numbers are easier than they first look when you keep them attached to the job. 770 on /srv/devworkspace means root gets full access, and devteam gets the same shared access. Everyone else gets nothing there. 700 on /srv/release-secrets means only root can even enter that directory. 600 on deploy-key.txt means only root can read or change the file. The important part is not the arithmetic. It is that each mode reflects a decision you already made about this path.
drwxrwx---  root devteam  /srv/devworkspace
drwx------  root root     /srv/release-secrets
-rw-------  root root     /srv/release-secrets/deploy-key.txt
⚠️ Warning: chmod 777 is not a real fix. It usually means the ownership or path design is wrong, so someone sprays wide-open permissions on top of the mistake instead of fixing the actual access design.
One advanced note, kept intentionally brief: in busier shared directories, admins sometimes use directory setgid behavior so newly created files inherit the team group automatically. That is useful later, but it belongs in a follow-up article. For this workflow, plain users, groups, ownership, and basic rwx rules are enough.
Step 5: Verify Both Access and Boundaries
Configuration is only half the job. Good Linux onboarding also tests the boundary. The success condition is not just “Maya can do something.” It is “Maya can do the intended work and still cannot cross into the restricted path.”
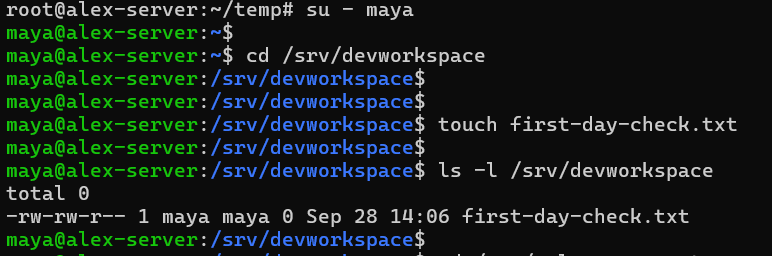
Start a fresh login context for Maya, then test one allowed action and one denied action:
su - maya
cd /srv/devworkspace
touch first-day-check.txt
ls -l /srv/devworkspace
Then test the boundary:
cd /srv/release-secrets
cat /srv/release-secrets/deploy-key.txt
The workspace test should work. Maya should be able to enter /srv/devworkspace and create a simple file there. The boundary test should fail with a permission error, and that failure is the success signal. Least privilege is supposed to have edges.
💡 Tip: If Maya still cannot use /srv/devworkspace even though the commands look right, open a fresh login session and test again. New supplementary group membership does not always appear consistently inside older shells.
This is the calm way to verify onboarding: confirm the happy path, then confirm the limit. Once you do both, the workflow stops being theory and becomes something you can trust on the next server too.
Common Mistakes That Break the Model
Most Linux permission confusion is not Linux being mysterious. It usually comes from the same small set of category mistakes. Sometimes the user is in the wrong team. Sometimes the path ownership is wrong. Sometimes the real problem is a bad assumption about what x means, or a permission shortcut used in place of proper design.

The table below is a practical way to debug that fog:
| Myth | Correction |
|---|---|
| “Maya is in devteam, so access should already work.” | Group membership only matters if the path’s owner/group and permissions match that team model. |
| “usermod -G is fine by itself.” | Without -a, it can replace existing supplementary groups instead of appending one more. |
| “New group membership applies instantly everywhere.” | Existing sessions may need a fresh login before the change shows up consistently. |
| “Directory x is the same as file x.” | On a directory, x means enter/traverse the path, not execute a program. |
| “chmod 777 fixes permission problems.” | It hides the real ownership or path-design issue by giving broad access to everyone. |
| “If this is annoying, just give admin rights.” | sudo or root bypasses the model instead of fixing it, which defeats least privilege. |
Most permission problems come from skipping a layer and reaching for chmod too early. Once you know whether the issue is identity, team membership, ownership, or the path rule, the fix becomes much more obvious.
The Practical Bottom Line
Linux access control gets much easier when you work in order instead of treating users, groups, and permissions like separate trivia. In this example, Maya got exactly what she needed. She has a real login and team access to the shared workspace. She does not have access to the release-secret path.

Use this checklist on any Ubuntu VPS or small hosted Linux server:
- Create the identity.
- Assign the shared team.
- Align the path ownership and group.
- Set the permission rule for that job.
- Test both access and boundaries.
That is the reusable checklist: identity → team → rule, with path alignment sitting in the middle so the rule actually has somewhere correct to apply. If you want to go deeper next, natural follow-ups include SSH access and sudo. Shared-directory patterns and broader Linux user/group management build on the same foundation. The core logic does not change; you just apply it to more specific situations.