English
 Русский
  Română
  Deutsch
  Français
  Türkçe
  Español
  Português
  Українська
  български
  Polski
  Indonesia
  中文 (中国)


 on All Hosting Services
How to View All Available Users in Linux: Complete Guide for VPS Administrators
Managing user accounts is one of the most fundamental responsibilities of any Linux system administrator. Whether you're auditing access permissions, troubleshooting login issues, or hardening your server's security posture, knowing exactly which users exist on your system is an essential skill. This guide walks you through every practical method to list and inspect Linux users — from reading raw system files to leveraging powerful command-line utilities.
If you're running a VPS Hosting environment with AlexHost, these techniques apply directly to your Ubuntu, Debian, or CentOS server and will help you maintain full control over who has access to your infrastructure.
Why Viewing Linux Users Matters for Server Security
Before diving into the commands, it's worth understanding *why* this task is so important. On any Linux server — especially one hosting web applications like WordPress, Laravel, or custom APIs — multiple user accounts accumulate over time:
- System users created automatically by installed services (e.g.,
www-data,mysql,nginx) - Administrative users with
sudoor root-level privileges - Application users tied to specific software stacks
- Forgotten or orphaned accounts left behind after software removal or staff changes
Regularly auditing these accounts helps you:
- Detect unauthorized or suspicious accounts
- Enforce the principle of least privilege
- Comply with security policies and audit requirements
- Identify misconfigured shells or home directories
With AlexHost's root access, NVMe-backed storage, and built-in DDoS protection, running these commands is fast, reliable, and safe — even on production systems under load.

Understanding the /etc/passwd File
All user account information in Linux is stored in the /etc/passwd file. This is a plain-text database that the operating system reads during authentication and user management operations. Each line in the file represents a single user account and follows this structured format:
username:password:UID:GID:comment:home_directory:shellHere's what each field means:
| Field | Description |
|---|---|
username | The login name of the user |
password | Historically stored here; now replaced by x (actual hash is in /etc/shadow) |
UID | User ID number (0 = root, 1–999 = system users, 1000+ = regular users) |
GID | Primary group ID |
comment | Optional description or full name (GECOS field) |
home_directory | Path to the user's home folder |
shell | The default shell assigned to the user |
A typical entry looks like this:
alexadmin:x:1001:1001:Alex Admin,,,:/home/alexadmin:/bin/bashUnderstanding this structure makes every method below much easier to interpret.
Method 1: View All Users by Reading /etc/passwd Directly
The most straightforward approach is to print the entire contents of /etc/passwd to your terminal. You have two primary options depending on how you want to navigate the output.
Using cat (best for short output or piping)
cat /etc/passwdThis dumps the entire file to standard output. On a typical server, you'll see dozens of entries — most of them system accounts.
Using less (best for interactive browsing)
less /etc/passwdThe less pager lets you scroll through the file interactively. Press q to quit, / to search, and arrow keys to navigate.
Sample Output
root:x:0:0:root:/root:/bin/bash
daemon:x:1:1:daemon:/usr/sbin:/usr/sbin/nologin
www-data:x:33:33:www-data:/var/www:/usr/sbin/nologin
alexadmin:x:1001:1001::/home/alexadmin:/bin/bash
deploy:x:1002:1002::/home/deploy:/bin/bash
Pro tip: Accounts with /usr/sbin/nologin or /bin/false as their shell cannot log in interactively — they are service accounts used by system daemons.
Method 2: Use getent to Query the User Database
The getent command (short for *get entries*) retrieves records from system databases defined in /etc/nsswitch.conf. This is the preferred method in modern Linux environments because it works correctly even when user accounts are sourced from external directories like LDAP or NIS — not just the local /etc/passwd file.
getent passwdThe output format is identical to /etc/passwd, but getent ensures you see *all* users regardless of where they are stored. On a standard AlexHost VPS, the output will match /etc/passwd, but using getent is considered best practice for portability and completeness.
Filter for a Specific User
getent passwd alexadminThis returns only the record for the alexadmin user — useful for quickly verifying that an account exists and checking its configuration.
Method 3: Extract Only Usernames with cut
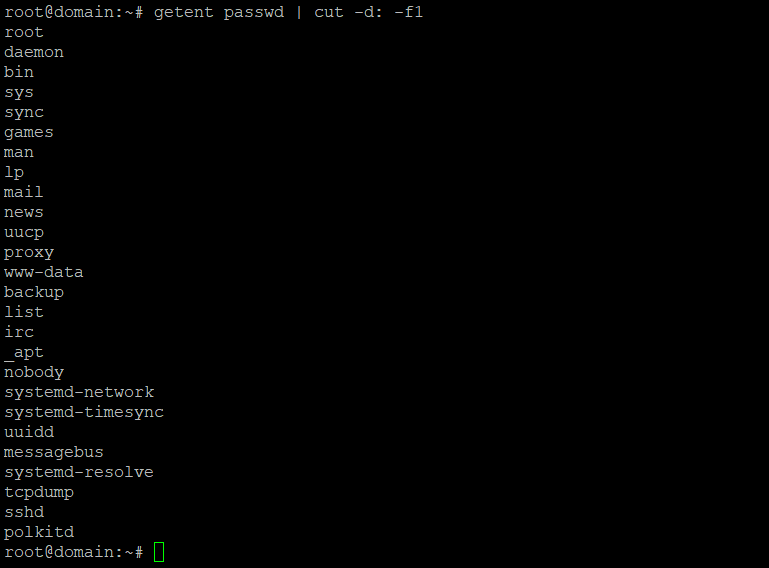
When you only need a clean list of usernames — without UIDs, home directories, or shell information — combine getent with the cut command to isolate the first field.
getent passwd | cut -d: -f1How it works:
getent passwdoutputs the full user database| cut -d: -f1pipes that output tocut, which uses:as the delimiter (-d:) and extracts only the first field (-f1) — the username
Sample Output
root
daemon
bin
sys
www-data
alexadmin
deploy
backup
This clean list is ideal for scripting, logging, or quickly scanning for unexpected accounts.
Show Only Human (Login) Users
System accounts typically have UIDs below 1000. To filter for regular human users only, combine awk with a UID check:
awk -F: '$3 >= 1000 && $1 != "nobody" {print $1}' /etc/passwdThis is especially useful on shared hosting environments or servers with many service accounts.
Method 4: Use awk for Custom, Selective Output
The awk command is a powerful text-processing tool that gives you full control over which fields to display and how to format them. This is invaluable when you need a quick overview of user accounts for administrative or security review purposes.
Display Usernames and Home Directories
getent passwd | awk -F: '{print "Username: " $1 "t Home Directory: " $6}'Sample Output
Username: root           Home Directory: /root
Username: www-data       Home Directory: /var/www
Username: alexadmin      Home Directory: /home/alexadmin
Username: deploy         Home Directory: /home/deploy
Display Usernames, UIDs, and Shells
getent passwd | awk -F: '{print "User: " $1 "t UID: " $3 "t Shell: " $7}'Show Only Users with a Valid Login Shell
getent passwd | awk -F: '$7 == "/bin/bash" || $7 == "/bin/sh" {print $1, $6, $7}'This command is particularly useful for security audits — it reveals every account that can actually open an interactive shell session on your server.
Method 5: Count the Total Number of Users
Need a quick count of all user accounts on the system?
getent passwd | wc -lTo count only human users (UID ≥ 1000):
awk -F: '$3 >= 1000' /etc/passwd | wc -lMethod 6: Check Which Users Have Sudo Privileges
Knowing who can escalate privileges is critical for security. Use these commands to identify privileged accounts:
Check the sudo group members
getent group sudoCheck the wheel group (common on CentOS/RHEL)
getent group wheelList all sudoers (requires root)
sudo cat /etc/sudoersOn your VPS with cPanel or any managed control panel environment, some users may have sudo rights granted through panel-specific configuration files in /etc/sudoers.d/.
Method 7: View Currently Logged-In Users
To see who is *actively* logged into your server right now, use the who or w command:
whowThe w command provides more detail, including what each user is currently running, their login time, and idle duration. This is an excellent first step when investigating suspicious activity on your server.
Practical Security Workflow: Auditing Users on Your Linux VPS
Here's a recommended workflow you can run periodically on any AlexHost server to maintain a clean and secure user environment:
# Step 1: List all human users
awk -F: '$3 >= 1000 && $1 != "nobody" {print $1}' /etc/passwd

# Step 2: Check who has sudo access
getent group sudo wheel

# Step 3: Identify accounts with login shells
getent passwd | awk -F: '$7 ~ /bash|sh/ {print $1, $7}'

# Step 4: See who is currently logged in
w

# Step 5: Review recent login history
last | head -20
Running this audit regularly — or automating it with a cron job — is a simple but effective way to keep your server secure. This is especially important if your VPS hosts multiple web applications or if you've granted SSH access to developers or contractors.
Managing Users Beyond Viewing: Next Steps
Once you've identified your users, you may need to take action. Here are the most common user management commands:
| Task | Command |
|---|---|
| Add a new user | sudo adduser newusername |
| Delete a user | sudo deluser --remove-home username |
| Lock an account | sudo passwd -l username |
| Change a user's shell | sudo chsh -s /usr/sbin/nologin username |
| Add user to sudo group | sudo usermod -aG sudo username |
These operations are fully supported on AlexHost's Linux VPS environments, where you have unrestricted root access to manage your system exactly as needed.
Choosing the Right AlexHost Hosting for Your Needs
The commands and techniques in this guide apply across all Linux server environments, but the right hosting plan makes a significant difference in performance and manageability:
- VPS Hosting — Full root access, dedicated resources, and NVMe storage. Ideal for developers and businesses needing complete control over their Linux environment.
- Dedicated Servers — Maximum performance and isolation for high-traffic applications or security-sensitive workloads requiring strict user access control.
- Shared Web Hosting — Managed environment for simpler projects where server-level user management is handled by AlexHost's team.
- VPS Control Panels — Simplify user and server management through intuitive graphical interfaces like cPanel, Plesk, or DirectAdmin.
Conclusion
Viewing and auditing user accounts on a Linux server is not just a routine administrative task — it's a cornerstone of good security hygiene. By mastering the methods covered in this guide, you gain clear visibility into every account on your system:
/etc/passwdandgetent passwdgive you the full picturecutstrips output down to just usernamesawklets you build custom, readable reportswhoandwreveal active sessions in real time- Group queries expose privilege escalation risks
Whether you're a seasoned sysadmin or just getting started with Linux server management, these tools are indispensable. Combine them with AlexHost's robust infrastructure — featuring NVMe-backed storage, full root access, and enterprise-grade DDoS protection — and you have everything you need to run a fast, secure, and well-administered server.
Ready to take full control of your Linux environment? Explore AlexHost VPS Hosting and get started today.