Türkçe
 English
  Русский
  Română
  Deutsch
  Français
  Español
  Português
  Українська
  български
  Polski
  Indonesia
  中文 (中国)


 tasarruf edin
Ollama’yı Bir LLM Sunucusuna Kendi Kendinize Kurun ve Yapay Zeka Sansürü Üzerinde Kontrolü Elinize Alın
Keywords
Before diving into the setup, here are the terms most likely to confuse readers in this guide. This quick glossary keeps the Linux, GPU, and local-model vocabulary clear from the start.
| Keyword | Brief explanation |
|---|---|
| 🤖 LLM | Large Language Model; an AI model that generates text from prompts. |
| 🦙 Ollama | A local model runner and server for downloading, serving, and calling LLMs on your own machine. |
| 🖥️ GPU | The graphics processor used here to accelerate model inference. |
| 💾 VRAM | The memory on the GPU; it is one of the main limits on how large a model can fit on a card. |
| ⚡ Inference | The act of running a model to generate an answer. |
| 🔄 systemd | The Linux service manager used to start, stop, restart, and enable services such as Ollama. |
| 🧩 NVIDIA driver | The software layer that lets Ubuntu talk to the NVIDIA GPU correctly for compute workloads. |
| 🚫 nouveau | An open-source Linux graphics driver that can prevent proper NVIDIA compute setup if it is used instead of the official NVIDIA driver. |
| 📊 nvidia-smi | NVIDIA’s command-line tool for checking GPU visibility, VRAM use, and driver health. |
| 🔌 API endpoint | A URL that tools or scripts call to send prompts to Ollama and receive responses. |
| ☁️ Vendor-controlled serving layer | The provider-managed API layer that can add moderation, logging, policy enforcement, or other controls before a model responds. |
| 🧬 Fine-tune | A modified version of a base model tuned for different tone, behavior, or special-purpose tasks. |
| ⚖️ Model weights | The learned internal parameters of the model; self-hosting does not automatically change them. |
| 📝 Modelfile | An Ollama file used to create a custom local model variant with your own system prompt and runtime parameters. |
| 🪪 UUID | A stable hardware identifier for a GPU; it is often safer than numeric GPU IDs because device order can change. |
| 🔒 TLS | The encryption used by HTTPS and reverse proxies to secure traffic between clients and the server. |
| 🌐 Reverse proxy | A front-end service that can add TLS, authentication, and controlled public access before forwarding requests to Ollama. |
| 🎛️ Temperature / seed | Generation settings; temperature affects randomness, while a fixed seed helps make repeated tests more comparable. |
| 🧱 CPU spill / mixed path | A situation where part of the model or workload falls outside GPU memory and uses CPU resources, which can slow inference. |
| 🔧 nvidia_uvm | An NVIDIA kernel module related to GPU memory management that sometimes needs to be reloaded during troubleshooting. |
Why Self-Hosting an LLM Is Worth It

If you have already done the hard part — rented the GPU server, installed Ubuntu, learned your way around SSH, and kept your own services running — it gets frustrating fast when a hosted AI still controls the last mile. It can refuse a perfectly ordinary request, bury the answer under disclaimers, change response style without warning, and keep every prompt flowing through someone else’s boundary. For a lot of technical users, that is the real frustration: not just what the model says, but who is in control of the serving layer when it says it.
This guide is about fixing that with open and local models, not about bypass tricks for proprietary APIs. You will self-host Ollama on an Ubuntu GPU server, run inference locally, verify that the GPU path is real, and see what changes when you choose a different model family. One misconception to clear up early: self-hosted does not automatically mean unrestricted. It means you control much more of the stack — and you stop depending on a vendor-controlled serving path — but the model you run can still carry its own alignment behavior.
📝 Note: The commands in this guide are validated against current Ollama documentation, but the terminal outputs shown below are representative examples rather than live benchmark captures. Use them as a success pattern, not as a performance claim.
By the end, you will have a working Ollama service on Ubuntu, a verified local API at 127.0.0.1:11434, proof that GPU-backed inference is actually happening, and a grounded comparison between a mainstream aligned model and a less-restricted alternative. This tutorial is written for readers who are comfortable with SSH, Ubuntu, sudo, and systemd, but who do not need prior Ollama experience.
The Exact Ubuntu GPU Server Used for This Guide

This walkthrough is anchored in a real single-GPU Ubuntu machine, because vague “should work on most servers” advice is how self-hosting guides become misleading. The reference box here is the actual class of host used for this guide: the kind of machine an advanced individual, lab, or small team would actually rent when they want private local inference without jumping straight to a rack of enterprise accelerators. It will still discuss multi-GPU behavior later, because Ollama does change once a model outgrows one card, but treat that part as future-facing context rather than proof from this exact server.
GPU Server — Ryzen 9 3950X + RTX 4070 Ti Super
| Component | Details |
|---|---|
| CPU | AMD Ryzen 9 3950X (16 cores / 32 threads) |
| GPU | 1× NVIDIA RTX 4070 Ti Super |
| VRAM | 16GB |
| Capability | Strong for 8B-class models; larger models become spill-or-upgrade decisions |
In practice, this is a very strong setup for everyday 8B-class models and still a useful one for larger local work up to the point where 16GB of VRAM becomes the real constraint. A model like llama3.1:8b at roughly 4.9GB fits easily on this card. A model like gpt-oss:20b at roughly 14GB is the kind of upper-end single-GPU test that still makes sense here. A model like qwen3:30b at roughly 19GB is better treated as a reference point for what changes on a larger or dual-GPU host than as a clean fit for this exact machine.
That distinction matters because the point of this article is not to squeeze the biggest possible number into a headline. It is to show what a sensible self-hosted LLM server looks like when you want privacy, local control, and enough GPU memory to run useful models without constant compromise. This hardware class is where self-hosted inference becomes realistic, not theoretical.
It also explains a few choices you will see later: mistral is used first because it gives a fast, low-friction proof that the stack works, while the behavior comparison stays in the 8B class where this machine is comfortable. qwen3:30b still appears later, but as a theoretical example of the kind of model that can trigger multi-GPU placement on a bigger host rather than as a live proof from this server. With expectations set, the next step is to validate the host before Ollama touches it.
Run These Pre-Installation Checks Before You Touch Ollama
Start with nvidia-smi. If this command is missing or fails, stop there and fix the NVIDIA driver first. Do not install Ollama yet, because a broken NVIDIA stack will make every later symptom look like an application failure when it is really a platform failure.
Run the GPU check first:
nvidia-smi
❗If Ubuntu says nvidia-smi is missing, do not assume the server has no GPU. A common failure mode on rented Ubuntu boxes is that the card is present but still bound to nouveau instead of the NVIDIA driver. Check section “Fix Nvidia Driver Issue on Ubuntu” first.
A healthy result on this server class should look roughly like this:
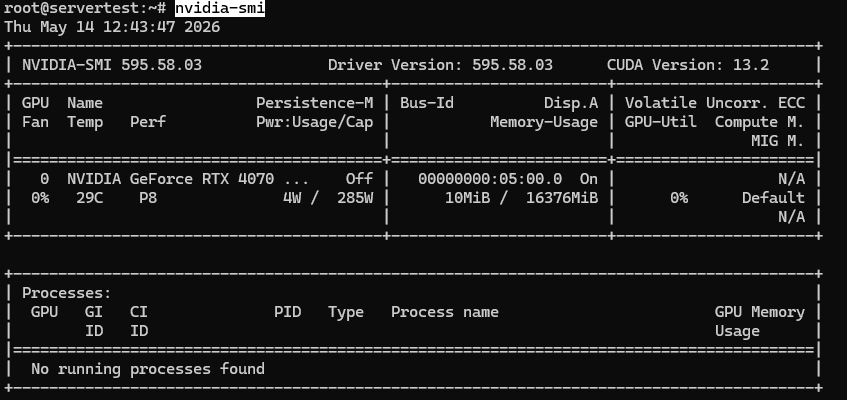
Once nvidia-smi works and the GPU is visible, continue with the checks below.
What you want to confirm is simple: the installed GPU is visible, it reports roughly 16GB of VRAM on this host, and the driver is loaded cleanly. If you are on a multi-GPU server, the same command should list each card.
nvidia-smi -L

❗ Important: Current Ollama GPU support documentation uses NVIDIA driver 531+ as the real floor for supported NVIDIA inference. Treat 531+ as the requirement for this guide, even if you have seen older community notes quoting lower versions.
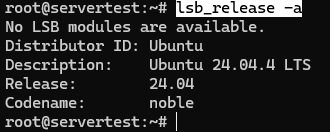
Now confirm that the host is really the Ubuntu environment this guide assumes:
lsb_release -a
Finally, check free disk space before you start downloading models. The install itself is small; the models are not. Once you move beyond tiny tests, a 20B-30B library can eat tens of gigabytes quickly, so 100GB+ free is the right mindset before serious local model work.
df -h /

If these checks pass, you have cleared the main infrastructure unknowns: the GPUs are present, the driver baseline is sane, Ubuntu is confirmed, and the disk has room for real model pulls. That is the point where installing Ollama becomes a clean next step instead of a guess.
Fix Nvidia Driver Issue on Ubuntu
Follow the steps below, to fix problems with “nvidia-smi” command.
lspci -nnk | grep -A3 -Ei 'VGA|3D|NVIDIA'
If that output shows an NVIDIA card and a line such as Kernel driver in use: nouveau, install the recommended Ubuntu driver package instead of installing nvidia-utils alone.
Install the ubuntu-drivers-common package (needed for driver management) and the kernel headers for your currently running kernel.
apt update
apt install -y ubuntu-drivers-common linux-headers-$(uname -r)
Scan your system and list available proprietary drivers (e.g., NVIDIA GPU drivers) that can be installed.
ubuntu-drivers devices
Then install the recommended driver package. In our case it was: nvidia-driver-595-open:
apt install -y nvidia-driver-595-open
reboot
After the reboot, rerun:
nvidia-smi
nvidia-smi -L
Install Ollama and Confirm the Service Is Healthy

The supported Ubuntu path is the official Ollama installer, not a custom tarball flow and not a Docker detour. That matters because this guide is about getting a reliable local service with predictable defaults, systemd integration, and sane ownership behavior on Linux.
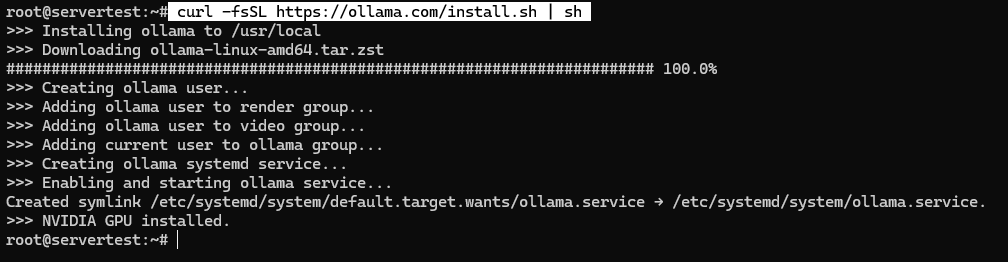
Run the installer exactly as documented:
curl -fsSL https://ollama.com/install.sh | sh
On a healthy system, the script installs the binary, creates the ollama service user, adds the right group memberships when available, writes the systemd unit, and starts the service bound to 127.0.0.1:11434.
Once the script finishes, validate the service instead of assuming success:
sudo systemctl status ollama --no-pager
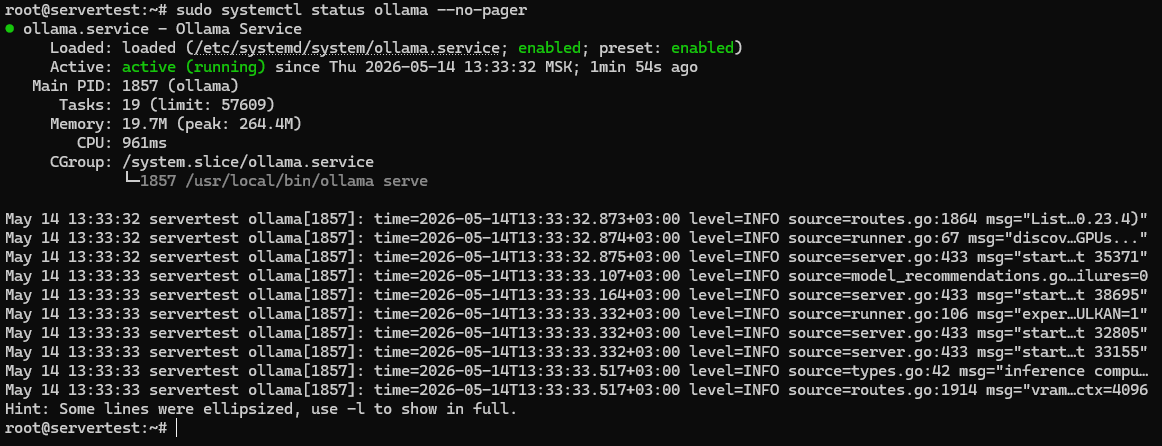
You are looking for three things here: the unit file is present, the service is enabled for boot, and Active: active (running) confirms the server is actually up.
First, establish the Linux service user account in a concrete way, and only afterwards think about how and where the model storage will be handled.
getent passwd ollama

That single line explains a lot of future behavior. Models on Linux live under the service’s ownership, and if you later move them to another disk without fixing permissions for the ollama user, you create your own breakage.
One more check closes the loop on the default bind:
ss -tlnp | grep 11434

⚠️ Warning: Ollama does not require authentication on the local API by default. That is fine when it is bound to 127.0.0.1, but it is not safe to expose port 11434 directly to the internet as if it were a hardened public service.
If the service does not come up cleanly, go to the logs first instead of reinstalling blindly:
journalctl -u ollama -n 100 --no-pager
That is the fastest way to catch permission problems, startup errors, driver detection issues, or bind problems. Once the service is healthy on localhost, the next thing to understand is how GPU placement behaves at runtime.
How Ollama Actually Uses One or Multiple GPUs
Even though the server used for this guide has one GPU, multi-GPU behavior is still worth understanding because many users can be on larger boxes or may expand later. A lot of two-GPU confusion starts with the wrong expectation: “I have two cards, so both should light up all the time.” That is not how Ollama works. The practical rule is much simpler: if a model fits on one GPU, Ollama will usually keep it on one GPU. It only spreads across multiple GPUs when the model does not fit comfortably on a single card.
Use these two checks together whenever you want to see the GPU performance:
ollama ps
watch -n 1 nvidia-smi
ollama ps tells you how the loaded model is being processed. 100% GPU means the model is fully resident on GPU memory. 100% CPU means GPU acceleration is not being used. A mixed state tells you some part of the workload or residency spilled outside the GPU path. watch -n 1 nvidia-smi complements that by showing live VRAM usage per card while the model is loaded.
The quickest way to keep those roles straight is this:
| Command | What it proves | What it does not prove |
|---|---|---|
| ollama ps | Whether the model is running on GPU, CPU, or a mixed path | Which exact card or cards are carrying the load |
| watch -n 1 nvidia-smi | Real-time VRAM activity per GPU | Whether dual-GPU usage automatically means a better model choice |
📝 Note: CUDA_VISIBLE_DEVICES is a visibility control, not a “use both GPUs” switch. If you ever constrain GPU access, prefer the UUIDs from nvidia-smi -L over numeric IDs because GPU ordering can vary between environments and reboots.
Run Your First Local Model and Verify GPU Inference
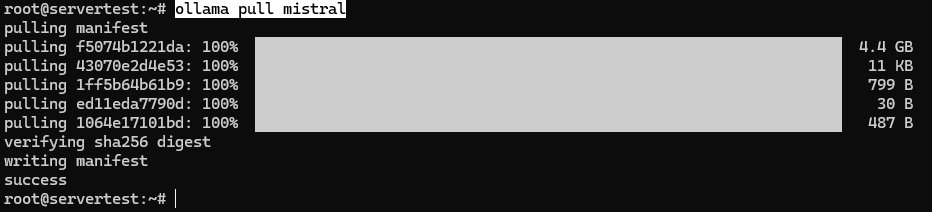
At this point, you do not need a giant model to prove that the server works. You need a fast, honest success. mistral is a good first pull because it is small, quick to download, and easy to load, even though llama3.1:8b will be the later baseline for behavior comparison.
Start by pulling the model:
ollama pull mistral
Now run a small prompt through it so the machine does something useful, not just administrative. The response might take a few seconds.
ollama run mistral "In one sentence, explain why people self-host LLMs."

To prove that this is GPU-backed inference rather than a CPU fallback, check the runtime state:
ollama ps

And to see what is already on disk, list the local inventory:
ollama list

mistral is the right first proof because it gives you a fast answer without turning setup validation into a long wait. Later, llama3.1:8b becomes more useful because it is a stronger aligned baseline for comparing model behavior.
Finally, check where the Linux install is storing models:
sudo du -sh /usr/share/ollama/.ollama/models

That path — /usr/share/ollama/.ollama/models — is the standard Linux model store documented by Ollama.
Once you see a successful response, 100% GPU in ollama ps, and disk usage increasing in the expected location, you have the first meaningful proof that the local stack works.
Prove It Is a Server, Not Just a CLI Wrapper
A command-line prompt is nice, but the reason to self-host Ollama is not only to chat inside a terminal. It is to run a local inference server that other tools, scripts, and applications can call without sending prompts through someone else’s API boundary. The fastest proof is one clean HTTP request to the native Ollama endpoint.
Send a local generate request with streaming disabled so the first response is easy to inspect:
curl http://localhost:11434/api/generate -d '{
"model": "mistral",
"prompt": "Say hello from a self-hosted Ollama server in one sentence.",
"stream": false
}'
A successful reply should come back as JSON and look roughly like this:
{
  "model": "mistral",
  "created_at": "2026-05-13T12:45:12.000000Z",
  "response": "Hello from a self-hosted Ollama server running locally on Ubuntu.",
  "done": true,
  "done_reason": "stop",
  "total_duration": 812345678,
  "load_duration": 12345678,
  "prompt_eval_count": 14,
  "eval_count": 12
}
The success checklist is straightforward: the HTTP request works locally, valid JSON comes back, done: true is present, and the model’s answer is in response. That is the point where Ollama stops being “a CLI that happens to download models” and becomes infrastructure you can actually integrate into local tools and automation.
If you want compatibility with software that expects an OpenAI-style request shape, Ollama also exposes /v1 endpoints locally:
curl -X POST http://localhost:11434/v1/chat/completions
-H "Content-Type: application/json"
-d '{
"model": "mistral",
"messages": [
{"role": "user", "content": "Say this is a test."}
]
}'
📝 Note: That “OpenAI-compatible” label is easy to misread. It does not mean you are talking to OpenAI, and it does not change the fact that the server is still local. It only means the request shape is familiar enough for tools and SDKs built around the OpenAI API pattern. The base URL remains http://localhost:11434/v1/, and any placeholder API key some client libraries insist on can be ignored for local Ollama use.
Where Model Restrictions Really Come From

This is the part that usually gets flattened into a single vague idea of “censorship”, but technically there are three different layers involved: the vendor’s serving layer, the model’s alignment and instruction tuning, and the prompt/runtime behavior you control yourself. Self-hosting changes some of those layers dramatically. It does not erase all of them.
A simple way to picture it is this:
Cloud API request:
You -> Vendor API gateway -> Vendor moderation / policy layer -> Model -> Response

Self-hosted Ollama request:
You -> Local Ollama server on 127.0.0.1 -> Model -> Response
Results:
– The vendor-controlled serving layer disappears from the local path
– The local network and logging boundary become yours
– The model’s own training and alignment still come with the model
Once you separate the layers, the earlier setup steps become much more meaningful:
| Layer | Controlled locally after this setup? | Proof point | What still remains true |
|---|---|---|---|
| Server process | Yes | ollama.service is running on Ubuntu | You now control uptime, logs, updates, and bind address |
| Network boundary | Yes | 127.0.0.1:11434 bind check | Local requests no longer require a vendor moderation hop |
| System prompt / runtime defaults | Yes | Modelfile for controlled system message | You can steer behavior, but not rewrite training |
| Vendor-side moderation layer | Usually removed for local-only inference | Native local API call succeeds on localhost | This is one of the biggest control shifts self-hosting gives you |
| Model alignment in the weights | No, not automatically | Different model tuning, gives different results | A local model can still hedge, refuse, or moralize |
| Model family choice | Yes | llama3.1:8b vs dolphin3 | Choose the one that fits your needs best |
You can think of it like a stage production. Self-hosting changes the stage, the lighting, the microphones, and the director’s notes. It does not retrain the actor. If a model was tuned to answer cautiously, hedge often, or refuse certain kinds of framing, running it locally will not magically undo that training.
What your current setup has already proved is narrower, but still important: you control the server process, you control the API boundary, and you are no longer routing local prompts through a vendor-owned moderation layer. That is a real shift in privacy and control. What it has not proved is that every local model will behave the same way or that every refusal in the future was caused by a cloud provider.
That is where model choice comes in. If you want the practical effect of fewer disclaimers, more direct answers, or less refusal-heavy behavior, you do not get there by saying “self-hosted” louder. You get there by choosing a different model family or fine-tune — and by understanding the tradeoffs that come with it.
Choose Less-Restricted Local Model

If you want a fair test, compare models that occupy roughly the same size class. That is why this guide uses llama3.1:8b as the mainstream aligned baseline and dolphin3 as the less-restricted comparison model. They are both around 4.9GB, which makes the behavior difference easier to interpret without also changing the hardware footprint too drastically.
Pull the comparison models locally:
ollama pull llama3.1:8b

ollama pull dolphin3
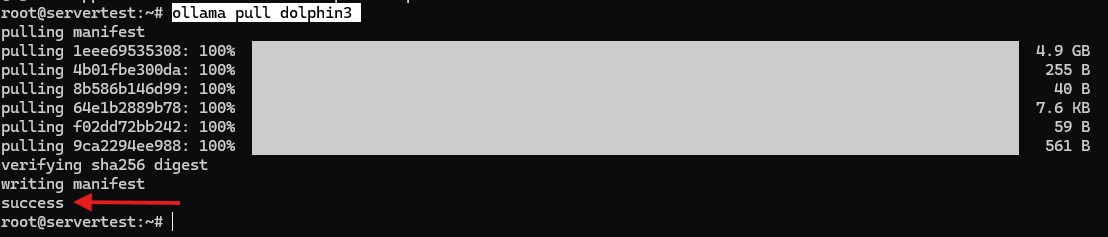
# Optional older reference model
ollama pull dolphin-mistral
Here is the practical framing for the three names you are most likely to see in this part of the Ollama ecosystem:
| Model | Approx. size | Role in this article | Practical reading |
|---|---|---|---|
| llama3.1:8b | 4.9GB | Mainstream aligned baseline | Good default reference for “normal” modern instruction-following behavior |
| dolphin3 | 4.9GB | Primary less-restricted comparison | Similar footprint, usually more direct, often less padded |
| dolphin-mistral | 4.1GB | Optional older alternative | Still useful historically, but not the best current daily-driver comparison |
⚠️ Warning: A different fine-tune is not “the same model with censorship removed.” It can change directness, disclaimer density, and willingness to follow user framing, but it can also change tone, factuality, consistency, and overall personality.
GPU performance
Before running the desired models, first it is essential to understand the possibilities and limitations of the involved hardware. So, there are two things to test conceptually: first, what clean single-GPU behavior looks like on the actual hardware used for this guide; second, what changes if you later run the same stack on a dual-GPU host. Both matter, but only the first one is a live proof from this exact machine.
On this server, the better upper-end runtime test is gpt-oss:20b. It is large enough to be interesting while still making sense on one 16GB card.
ollama pull gpt-oss:20b

ollama stop mistral
ollama run gpt-oss:20b "Explain in one paragraph why a 14GB model is a realistic upper-end single-GPU test on a 16GB card."

After the model loads, confirm the runtime state:
ollama ps

That is the practical proof you want on this machine. It shows that smaller models fit easily and that a larger but still realistic local model can push one 16GB card close to its usable envelope without needing multiple GPUs.
If you later run Ollama on a two-GPU host, a model such as qwen3:30b becomes the kind of workload that can demonstrate multi-GPU placement. The workflow is the same — watch nvidia-smi, run the model, inspect ollama ps — but the point is not to make both cards light up for its own sake. The point is to confirm that Ollama only spreads a model across multiple GPUs when the model no longer fits cleanly on one.
Censorship Bypassing Considerations

For behavior comparison, keep the conditions controlled so you are testing the model more than the randomness. Use the same endpoint, the same prompt, stream: false, a low temperature, and a fixed seed:
curl http://localhost:11434/api/generate -d '{
"model": "llama3.1:8b",
"prompt": "<comparison prompt>",
"stream": false,
"options": {
"temperature": 0.2,
"seed": 42
}
}'
Then repeat the same request with “model”: “dolphin3”. Fixed seed does not erase all variance, but it reduces enough randomness to make tone and compliance differences easier to see.
- A safe first prompt is: “Does self-hosting an LLM mean the user fully controls the model’s behavior? Answer in 4 bullet points. Be direct and skip preambles.” A representative llama3.1:8b answer tends to sound like this:
- Self-hosting gives you more control over deployment, privacy, and availability.
- It does not automatically remove the model's built-in alignment behavior.
- The model may still refuse or soften some responses depending on its training.
- Full control comes from combining self-hosting with careful model selection and configuration.
A representative dolphin3 answer to the same prompt often sounds more stripped down:
- You control the machine, the network boundary, and the serving layer. - You do not erase the model's training history just by running it locally. - Vendor-side policy can disappear, but model-side alignment can still remain. - Real control comes from choosing a model whose behavior matches your use case. - A second useful prompt is: “Write a sharp five-sentence case for why a privacy-sensitive team might reject vendor-managed AI. No intro and no conclusion.” llama3.1:8b usually complies, but in a more measured corporate tone. dolphin3 more readily follows the requested sharpness. That is the kind of difference you are looking for here: not dramatic lawless output, but changes in directness, framing, and disclaimer density.
- The third prompt category for validation can be as follows: ask for five factual reasons a writer might prefer a local model for unusual, niche, or non-mainstream creative work. In practice, both models answer, but dolphin3 tends to stay closer to the requested non-moralizing tone, and direct answers.
The pattern looks like this:
| Prompt type | llama3.1:8b baseline behavior | dolphin3 behavior | Practical takeaway |
|---|---|---|---|
| Directness vs hedging | More careful, slightly more explanatory | More compressed and direct | Same facts, different refusal/disclaimer style |
| Sharper tone compliance | Often answers, but softens the rhetoric | More willing to follow the requested edge | Framing obedience is part of model choice |
| Niche creative framing | Factual, sometimes padded | Factual, usually less moralizing | “Less-restricted” often shows up as tone, not pure capability |
And thus, here are the honest takeaways:
- Local model choice significantly changes output behavior.
- Different models vary in directness and disclaimer density.
- Self-hosting removes a vendor-controlled serving layer.
You Now Control the Stack, Not Just the Prompt

The frustration from the beginning of this guide was never only about a model refusing a request. It was about the fact that the serving layer, policy layer, and privacy boundary lived somewhere else. After this setup, that part has changed. Your inference server runs on your Ubuntu machine, the local API boundary is yours, the model menu is yours, and your prompt/runtime defaults are yours to tune.
What still requires judgment is the part no installer can solve for you: choosing models that match your use case, steering them with sane defaults, and exposing access securely if you move beyond localhost. That is the real shape of self-hosting control. Not magical freedom from every restriction, but ownership of the stack that decides how, where, and with which model inference happens. If you want the best next step, start by creating a custom Modelfile — or by putting secure remote access in front of the local API when you are ready.
What to Do After the Base Setup

At this point, the core promise is fulfilled. The server works, the API works, the GPU path is real, and the model behavior differences are no longer abstract. The next move is not “install more things blindly.” It is to tune the parts of the stack that now belong to you.
Customizing Model Behavior with a Modelfile
A Modelfile is the cleanest way to change local prompting defaults without touching the model weights themselves. Start by inspecting the model’s current definition so you understand what you are extending:
ollama show --modelfile dolphin3
Then create a simple local variation:
FROM dolphin3

SYSTEM You are a direct, factual assistant for a self-hosted Ubuntu LLM server.
Prefer short, practical answers and avoid padded disclaimers.

PARAMETER temperature 0.2
PARAMETER num_ctx 8192
Build it as a new model name and test it:
ollama create dolphin3-local -f ./Modelfile
ollama run dolphin3-local "Summarize what changed in this custom model in 3 bullets."
❗ Important: A Modelfile changes prompting and runtime behavior, not the model’s training history. It can steer tone and defaults, but it does not retrain the underlying model.
Securing the Setup
Localhost binding is a good default, but it is not the end of the security story. Re-check the current listen address first:
ss -tlnp | grep 11434
If the goal is to keep Ollama local-only, pin that behavior explicitly with a systemd override:
sudo systemctl edit ollama
Add the following:
[Service]
Environment="OLLAMA_HOST=127.0.0.1:11434"
Environment="OLLAMA_NO_CLOUD=1"
Then reload and restart the service:
sudo systemctl daemon-reload
sudo systemctl restart ollama
If you need remote access later, do not publish 11434 directly. Put a reverse proxy with TLS and authentication in front of it instead:
server {
    listen 443 ssl http2;
    server_name llm.example.com;

    auth_basic "Restricted";
    auth_basic_user_file /etc/nginx/.htpasswd;

    location / {
        proxy_pass http://127.0.0.1:11434;
        proxy_set_header Host localhost:11434;
    }
}
⚠️ Warning: Treat public exposure as a separate hardening project. Ollama on its own is a local inference server, not a production-ready public API gateway with built-in auth, rate limiting, and internet-facing defaults.
Recommended Models for This Hardware
Once the base install works, the highest-value improvement is choosing models that actually fit this machine well instead of chasing the biggest headline. For the single-4070 Ti SUPER server used here, the practical menu looks like this:
| Use case | Model | Size | Expected placement | Why it fits this machine |
|---|---|---|---|---|
| First success | mistral | 4.4GB | Single GPU | Fast, simple, low-friction validation |
| General baseline | llama3.1:8b | 4.9GB | Single GPU | Strong mainstream reference point |
| Less-restricted 8B | dolphin3 | 4.9GB | Single GPU | Best like-for-like comparison with llama3.1:8b |
| Reasoning tier | gpt-oss:20b | 14GB | Usually single GPU | Stronger reasoning while still fitting cleanly |
| Higher-quality local tier | qwen3:30b | 19GB | Needs dual-GPU or larger VRAM | Better as a future-upgrade target than a clean fit for this exact machine |
| Code-focused tier | deepseek-coder:33b | 19GB | Needs dual-GPU or larger VRAM | Strong option if you move to a bigger box or add a second GPU later |
| Experimental only | llama3.1:70b | 43GB | Severe CPU spill / much slower / reduced-context tradeoffs | Not a realistic target for this host unless you accept heavy compromise |
Auto-Start and Maintenance
After the fun part comes the part that keeps a local LLM server usable a month from now. Confirm boot-time behavior, keep the service updated, watch the logs, and know how to unload large models when you need the VRAM back.
sudo systemctl is-enabled ollama
sudo systemctl enable --now ollama
curl -fsSL https://ollama.com/install.sh | sh
journalctl -u ollama -n 100 --no-pager
For day-to-day model operations, these are the commands you will use most often:
ollama list
ollama ps
ollama stop gpt-oss:20b
sudo du -sh /usr/share/ollama/.ollama/models
And if model storage has to move to a bigger disk, prepare the directory for the service user before you re-point Ollama:
sudo mkdir -p /mnt/ai/ollama-models
sudo chown -R ollama:ollama /mnt/ai/ollama-models
Then set OLLAMA_MODELS through systemctl edit ollama. That one ownership detail is what prevents a storage migration from turning into a permissions problem.
Troubleshooting Reference
When something breaks, the fastest path is usually matching the symptom to the right layer instead of trying random reinstall loops. Use this table as the first pass:
| Symptom | Likely cause | Check | Fix |
|---|---|---|---|
| nvidia-smi fails | Driver or GPU stack issue | nvidia-smi, lspci -nnk | grep -A3 -Ei ‘VGA|3D|NVIDIA’, ubuntu-drivers devices | Fix the NVIDIA layer first; if Ubuntu is using nouveau, install the recommended NVIDIA driver, reboot, and rerun nvidia-smi |
| ollama.service will not start | Service, permission, or bind issue | systemctl status ollama, journalctl -u ollama -n 100 –no-pager | Resolve the service error before pulling models |
| Model runs on CPU | GPU discovery failed or fallback occurred | ollama ps, logs | Restart the service; if needed reload nvidia_uvm |
| Only one GPU is active | The model fits on one card | watch -n 1 nvidia-smi | This is normal; on a multi-GPU host, test with a model that exceeds one card’s VRAM envelope if you want to observe multi-GPU placement |
| Port 11434 is exposed on 0.0.0.0 | Bind address changed | ss -tlnp | grep 11434 | Set OLLAMA_HOST=127.0.0.1:11434 and restart |
| Model path errors after moving storage | Wrong ownership on model directory | ls -ld <model-dir> | sudo chown -R ollama:ollama <model-dir> |
| GPU disappears after suspend/resume | NVIDIA UVM issue | logs and GPU checks | Reload nvidia_uvm and restart the service if needed |
If you only remember one operational rule from this section, make it this one: treat Ollama like a real service, not a disposable CLI utility. Logs, ownership, bind addresses, and storage paths matter just as much as the prompt window.