English
 Русский
  Română
  Deutsch
  Français
  Türkçe
  Español
  Português
  Українська
  български
  Polski
  Indonesia
  中文 (中国)


 on All Hosting Services
Step-by-Step IPKVM Setup and Usage Tutorial for Windows OS
What Is IPKVM and Why Does It Matter for Server Management?
IPKVM (Internet Protocol Keyboard, Video, and Mouse) is a powerful remote server management technology that gives system administrators complete, hardware-level control over a server — exactly as if they were sitting directly in front of it. Unlike conventional remote desktop tools, IPKVM operates independently of the server's operating system, making it an indispensable solution for managing servers in remote data centers or handling critical failure scenarios.
Whether you need to reconfigure BIOS settings, troubleshoot a failed boot sequence, or reinstall an operating system from scratch, IPKVM gives you the access you need — even when the server is completely unresponsive at the OS level.
Key Features of IPKVM
Full OS and BIOS-Level Control
IPKVM provides unrestricted remote access to a server's BIOS and operating system. Administrators can perform tasks such as:
- Diagnosing and resolving boot failures
- Modifying BIOS and UEFI firmware settings
- Installing, reinstalling, or repairing an operating system
- Mounting virtual media (ISO images) for remote OS deployment
All of this is achievable without any dependency on the server's primary network connection or installed software stack.
Platform Independence
IPKVM works regardless of the server's current operating system state. Whether the OS is crashed, corrupted, mid-installation, or simply offline, IPKVM maintains a consistent management interface. This makes it invaluable for heterogeneous environments running Windows Server, Linux distributions, or any other platform.
Out-of-Band Management
One of IPKVM's most critical advantages is its out-of-band architecture. It operates on a completely separate management network, meaning your administrative access remains intact even if:
- The primary network interface fails
- The OS crashes or becomes unresponsive
- A misconfigured firewall rule locks you out
- The server enters a kernel panic or BSOD state
This level of resilience is a core reason why IPKVM access is offered alongside AlexHost's Dedicated Servers — ensuring that mission-critical infrastructure is never truly out of reach.
Prerequisites Before You Begin
Eligible Dedicated Server Plans
IPKVM access is available as an add-on option for the following AlexHost dedicated server configurations:
- PROMO Dual Core DDR3
- PROMO Core i3 DDR3
- PROMO Core i5 DDR3
- PROMO Core i7 DDR3
- Intel® Xeon® E5-2620
- Intel DualCore DDR4
- Intel Core i7 DDR4
- Intel Core i9 DDR4 (9th Gen)
- Intel Core i9 DDR4 (10th Gen)
- Intel® Xeon® E5-2690 v3
- AMD Ryzen™ 9 3950X
> Note: If you are evaluating a high-performance server for compute-intensive workloads, also consider AlexHost's GPU Hosting plans, which combine raw processing power with the same enterprise-grade management capabilities.
Request Your IPKVM Credentials
Before proceeding with the software setup, you must obtain your IPKVM login credentials from the AlexHost support team. Here's how:
- Log in to your AlexHost client area.
- Open a new support ticket and request IPKVM access credentials.
- In your ticket, include the static IP address you will use to connect to the IPKVM service. This is required for security whitelisting.
- Wait for the support team's reply — they will provide your IPKVM IP address, username, and password.
> Important: You must provide a static IP address. Dynamic IP addresses are not supported for IPKVM authentication due to security restrictions.
Step 1: Download and Install Java SE Development Kit 6u45
The Raritan MPC (Multi-Platform Client) used for IPKVM access requires Java SE Development Kit 6u45 to function correctly. Follow these steps to install it on your Windows machine.
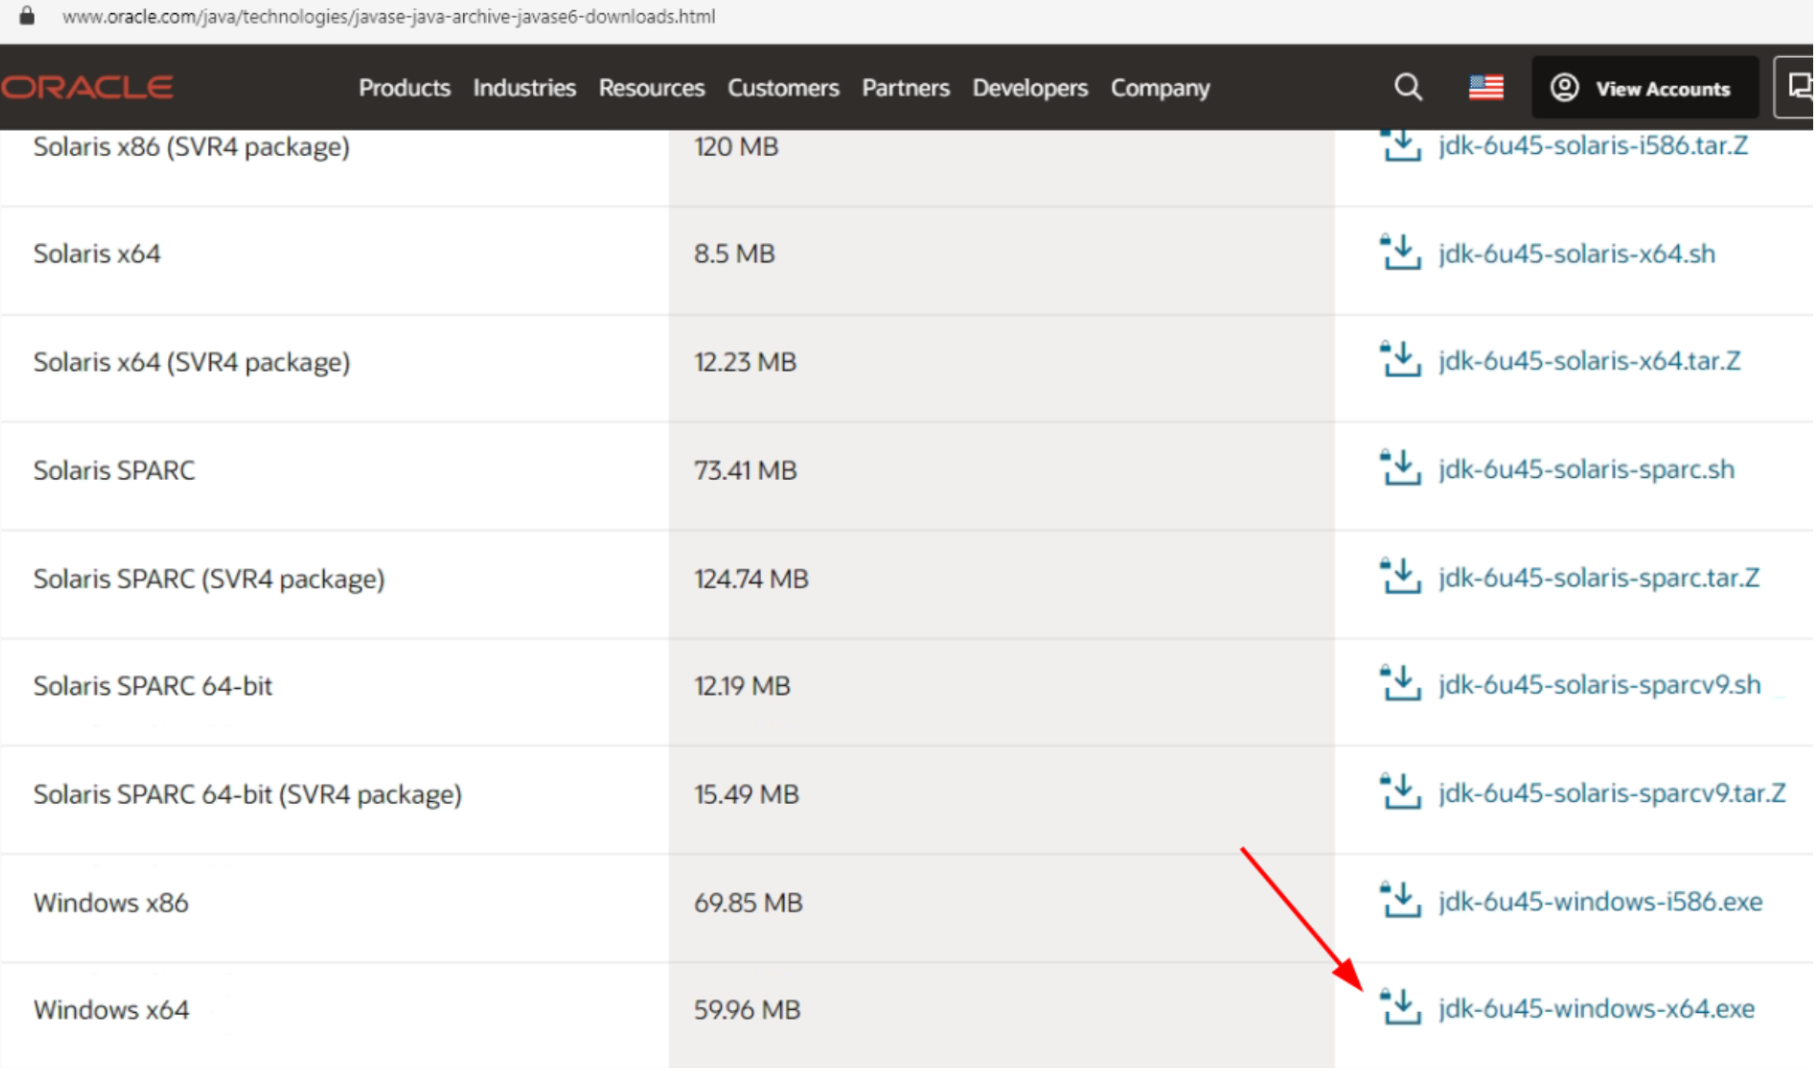
1.1 — Download the JDK Installer
- Navigate to the Oracle Java SE Development Kit 6 Downloads page.
- Locate the download entry for Java SE Development Kit 6u45.
- For 64-bit Windows systems, select the file:
jdk-6u45-windows-x64.exe
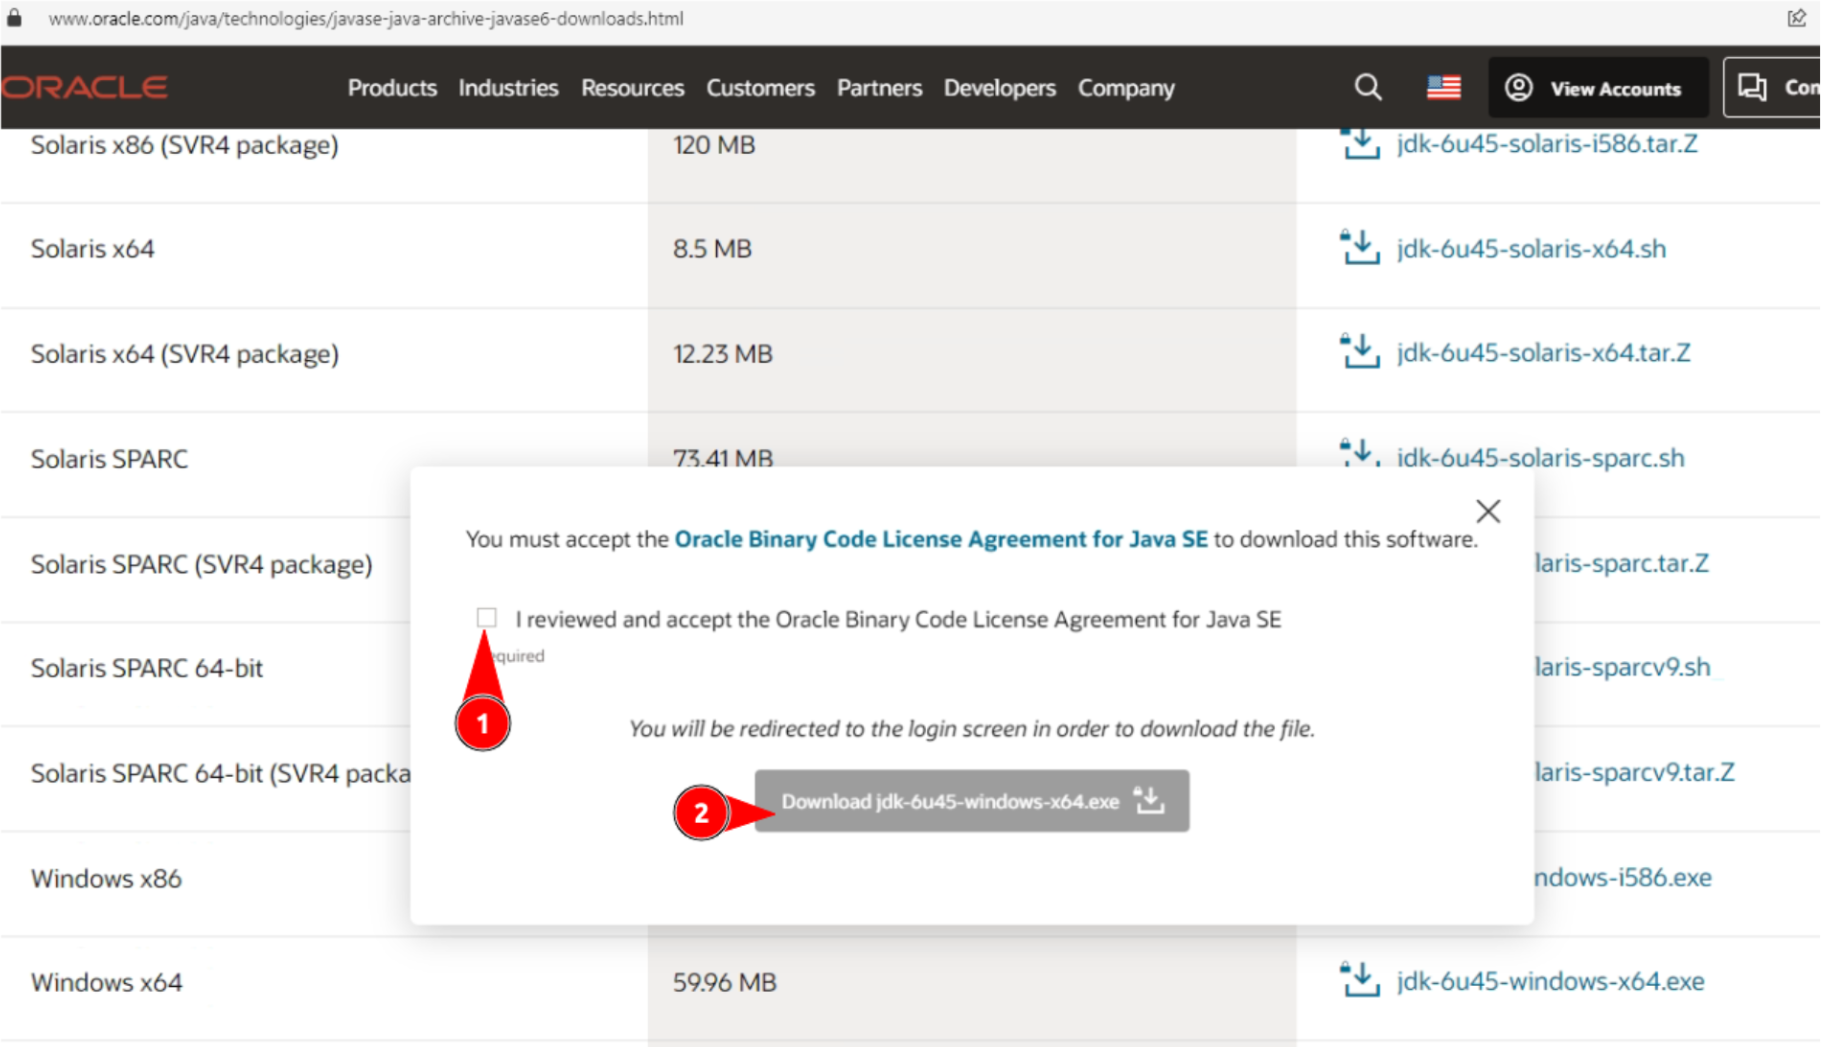
> Note: An Oracle account is required to download the JDK. Registration is free. If you do not already have an account, create one before proceeding.
Available installer formats by platform:
| Operating System | File Format |
|---|---|
| Windows (64-bit) | jdk-6u45-windows-x64.exe |
| Windows (32-bit) | jdk-6u45-windows-i586.exe |
| Linux (RPM-based) | jdk-6u45-linux-x64-rpm.bin |
| Linux (generic) | jdk-6u45-linux-x64.bin |
1.2 — Run the JDK Installer
- Once the download is complete, locate the
.exefile in your Downloads folder. - Double-click the file to launch the JDK 6 Setup Wizard.
- Follow the on-screen prompts to complete the installation, accepting the default installation path unless you have a specific reason to change it.
- Click Finish once the installation completes successfully.
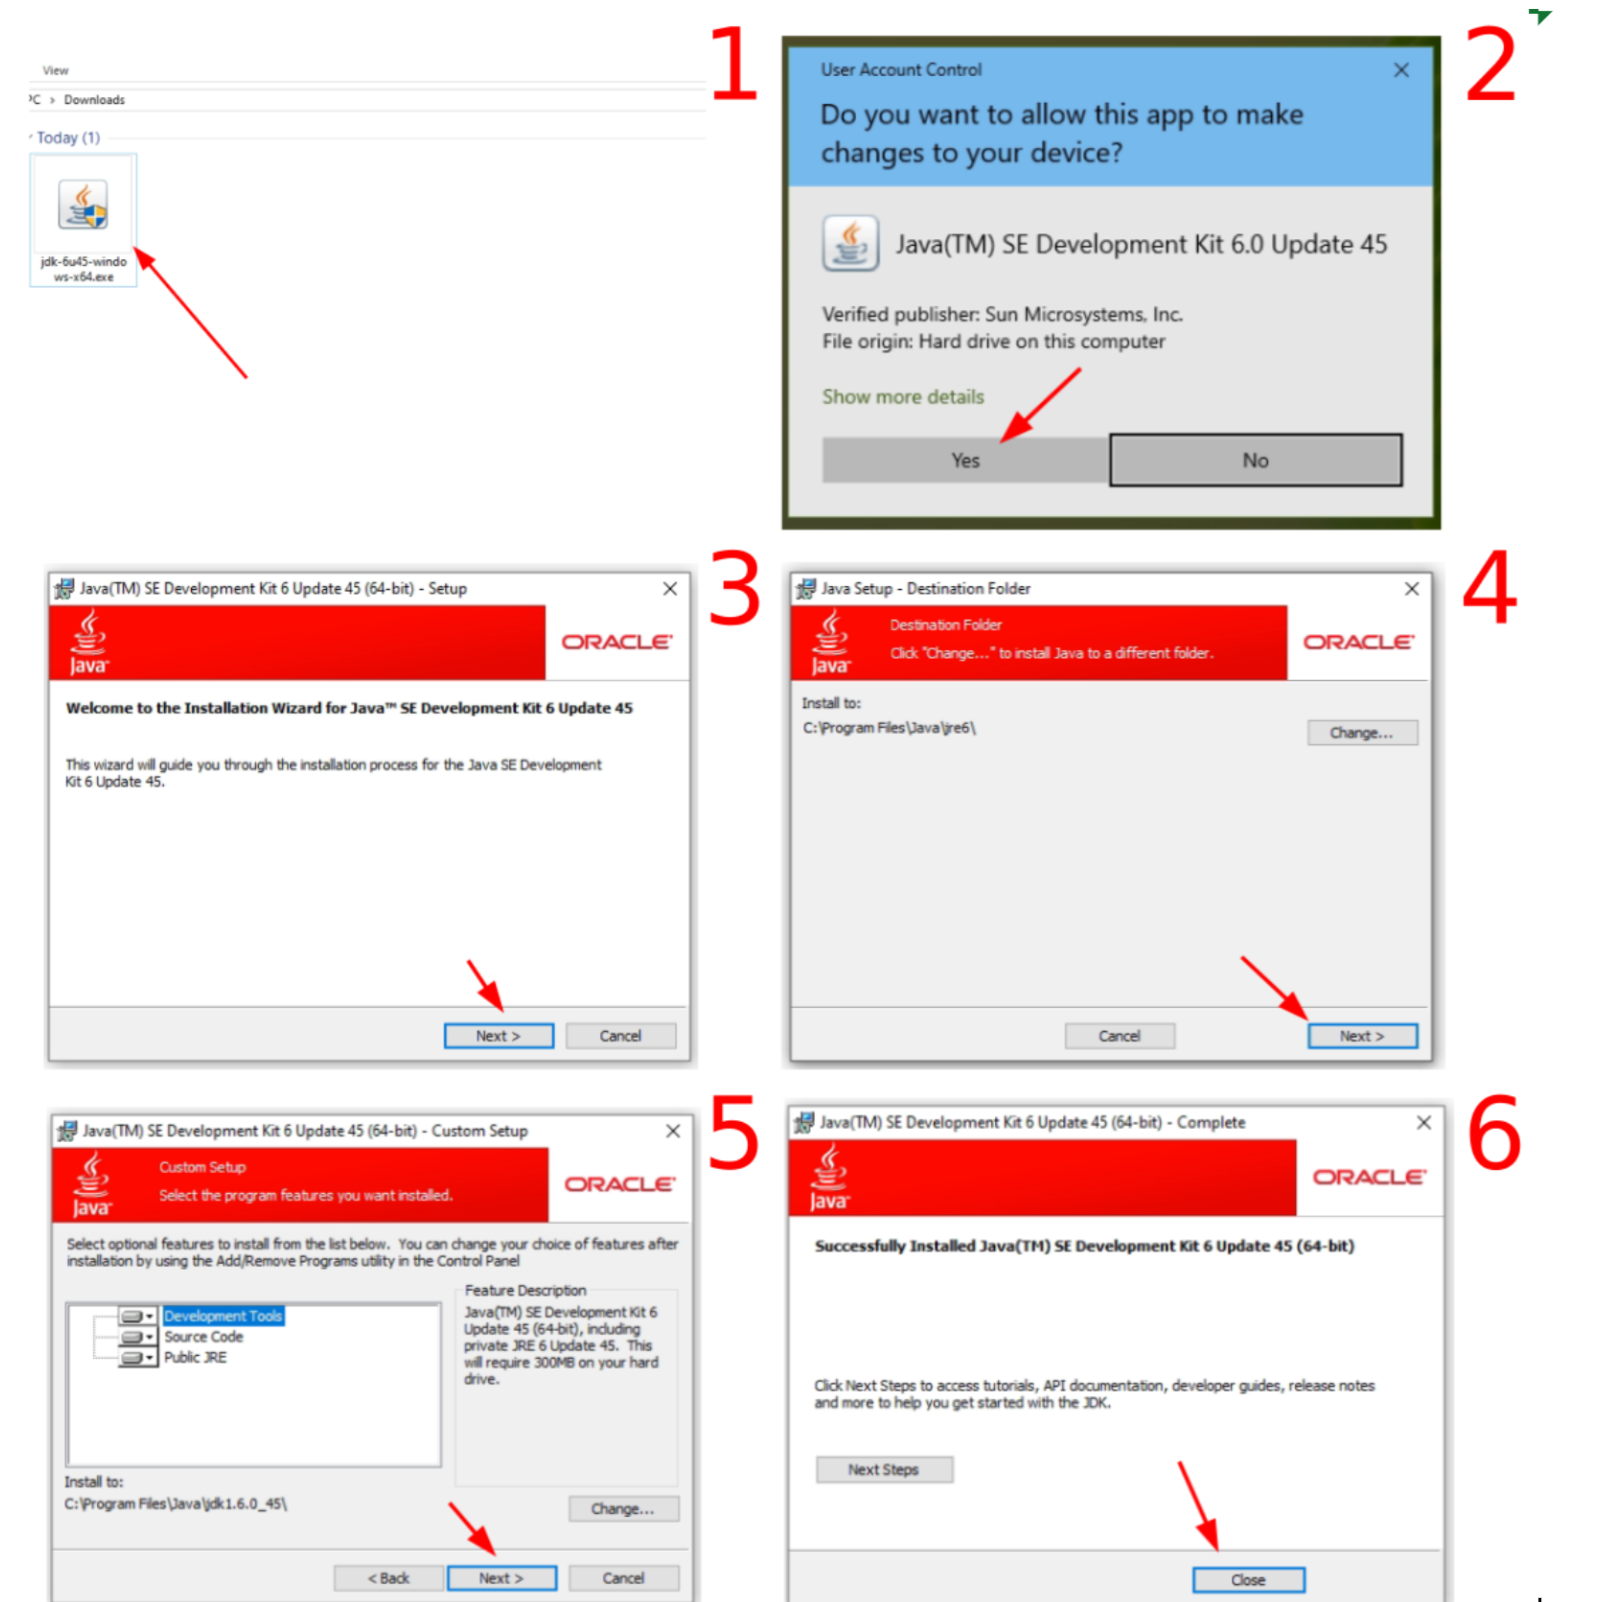
Java is now installed and ready to support the Raritan MPC client.
Step 2: Download and Install the Raritan MPC Client
The Raritan Multi-Platform Client (MPC) is the software interface used to connect to the IPKVM device (specifically the Raritan Dominion KX II hardware used in AlexHost's data centers).
2.1 — Download the MPC Client
- Open your browser and navigate to the official Raritan support page:
https://www.raritan.com/support/product/dominion-kx-ii
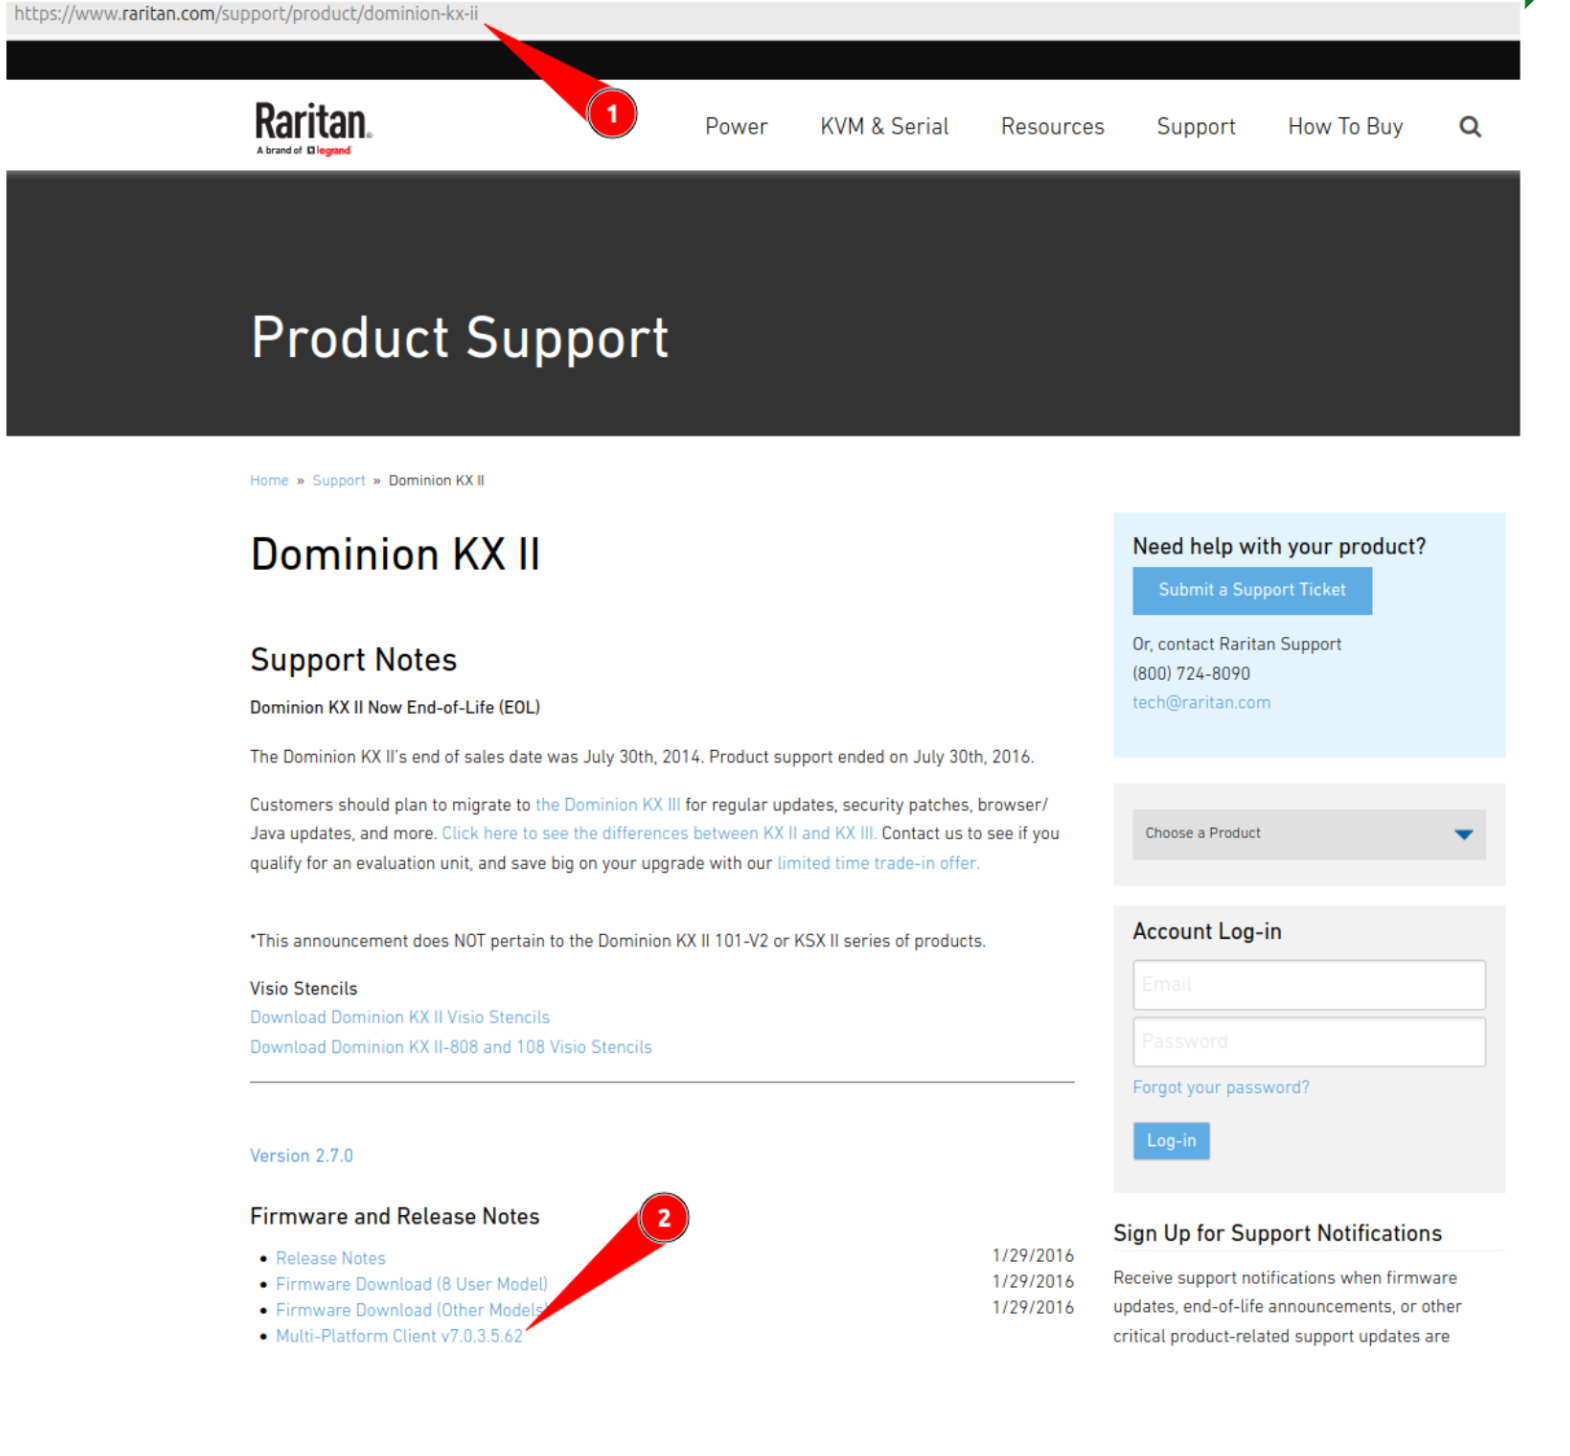
- Locate the MPC Client download section.
- Download the appropriate version for your operating system.
2.2 — Install the MPC Client
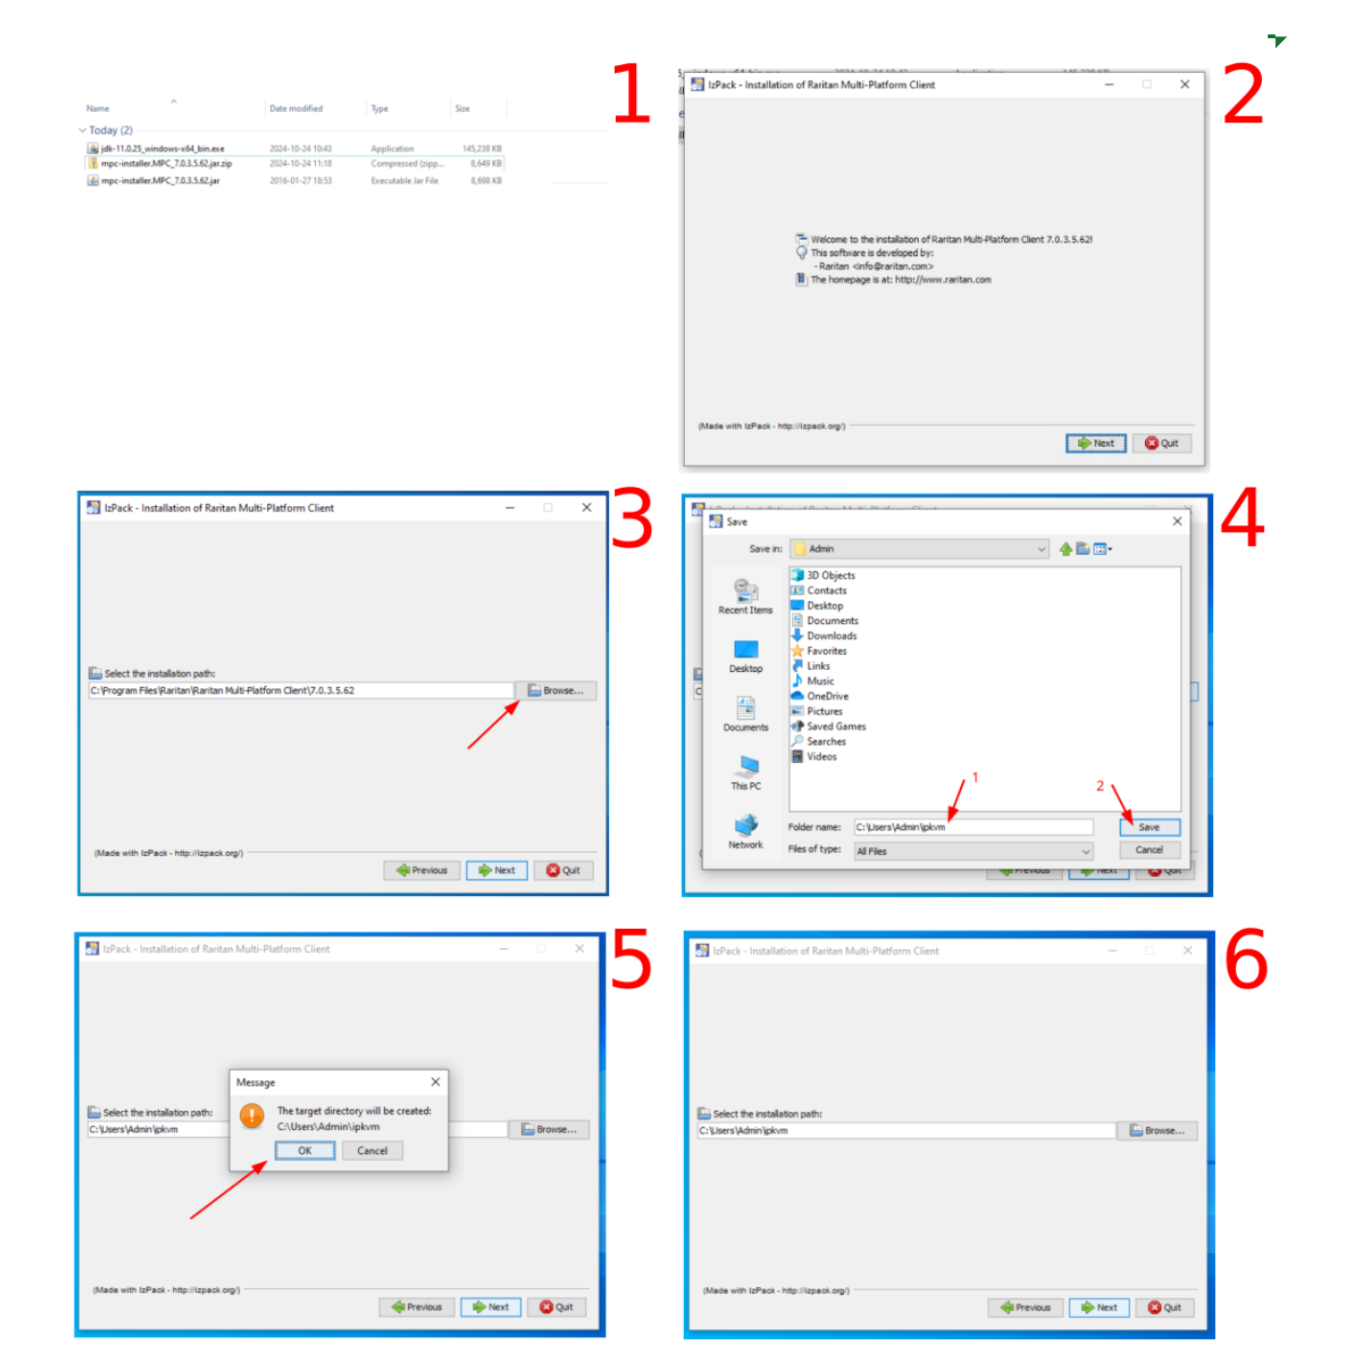
Follow these steps carefully to install the Raritan MPC client:
- Go to your Downloads folder and locate the downloaded archive file.
- Extract the archive contents to a temporary location.
- Run the extracted installer file to launch the setup wizard.
- On the Welcome screen, click Next to proceed.
- On the installation path screen, click Browse to select a destination folder.
- Choose a directory where your user account has write permissions (e.g.,
C:UsersAdminipkvm). - Click Save to confirm your chosen path.
- When prompted to confirm the creation of the target folder, click Yes.
- Click Next to begin the installation process.
- The installation progress window will appear — wait for it to complete.
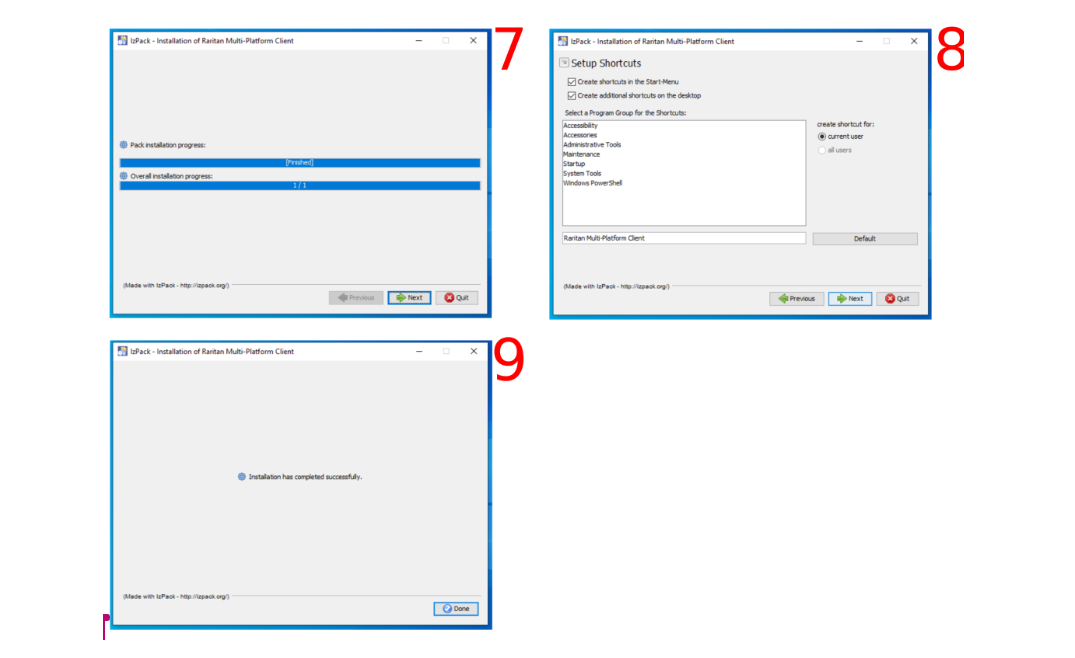
- On the Setup Shortcuts screen, click Next to accept the default shortcut settings.
- Once installation is complete, click Close to exit the installer.
Step 3: Configure a New IPKVM Connection Profile
With both Java and the Raritan MPC client installed, you are now ready to configure your connection to the IPKVM device.
3.1 — Create a New Connection Profile
- Locate the Raritan MPC icon on your desktop or in your Start Menu and launch the application.
- In the MPC interface, click "Create New Profile".
- Fill in the profile details:
- Description: Enter a meaningful name for this connection (e.g.,
AlexHost-Server-01). - IP Address: Enter the IPKVM IP address provided in your support ticket response.
- Click OK to save the profile.

3.2 — Establish the Connection
- After saving the profile, the MPC client will begin attempting to connect to the IPKVM device.
- Wait patiently — the initial connection can take up to a few minutes to establish as the client authenticates with the hardware.
- Once connected, the connection icon will change to indicate an active status.
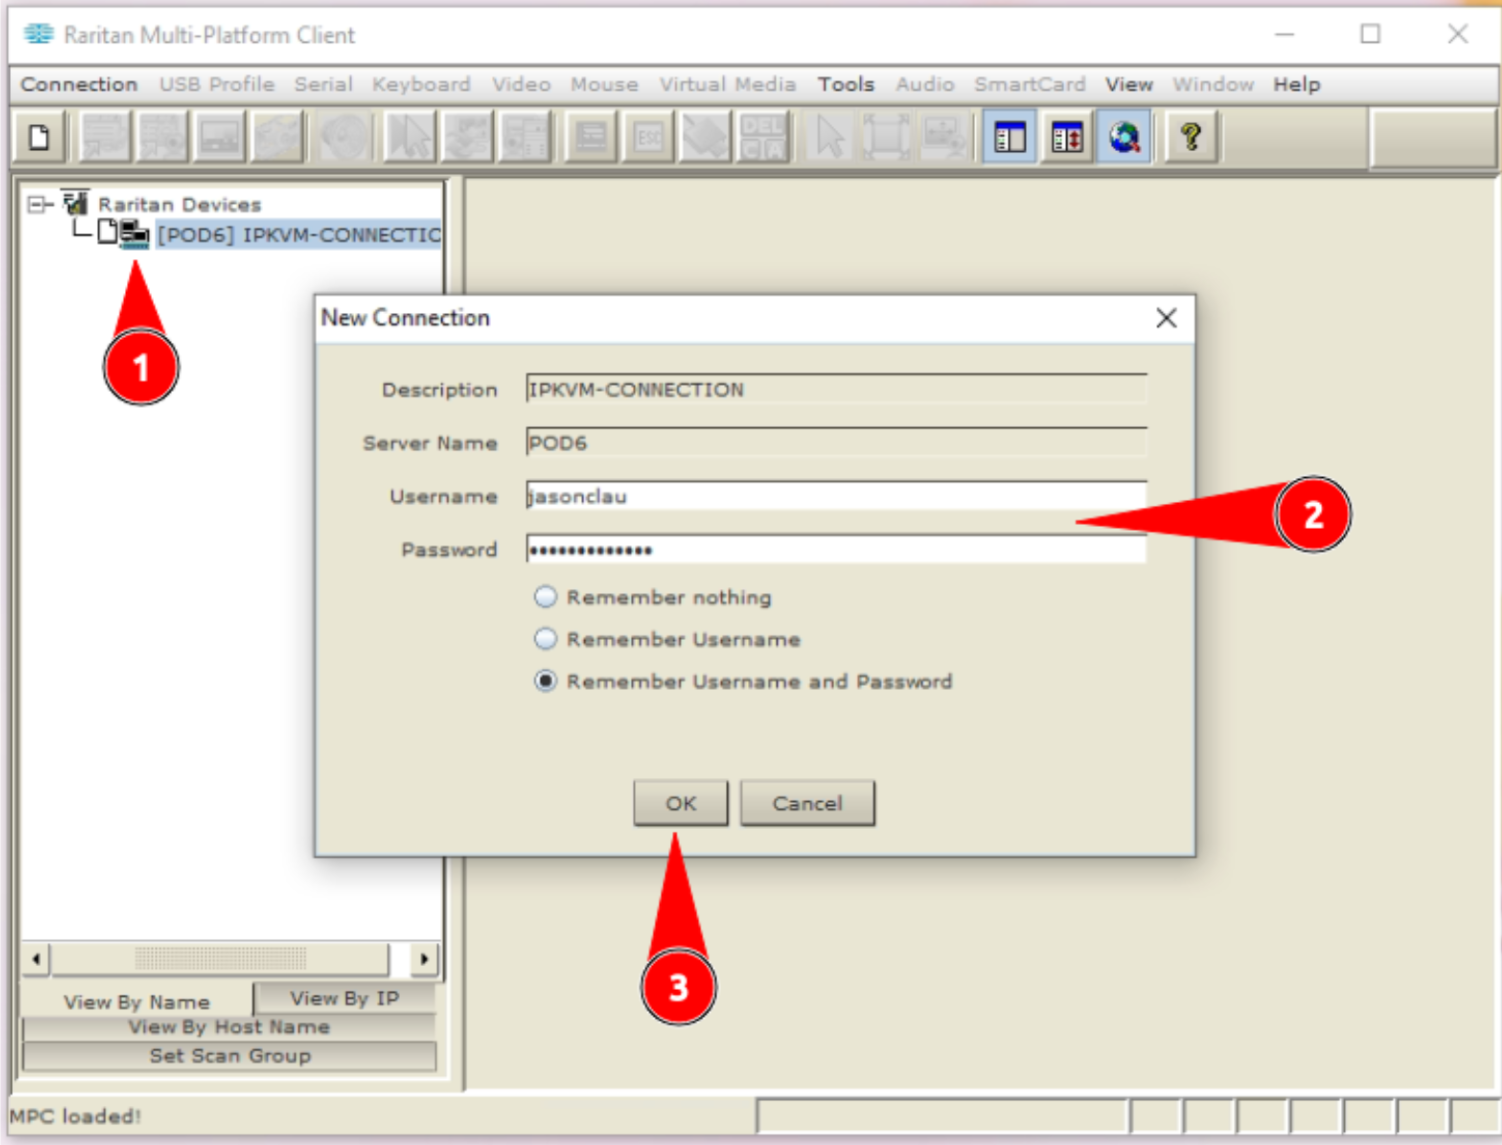
- Double-click on your connection profile name to open the authentication dialog.
- Enter the username and password provided in your AlexHost support ticket.
- Click OK to authenticate.
3.3 — Access and Control Your Server
- After successful authentication, the MPC interface will display the available server ports on the IPKVM device.
- Double-click on the port name corresponding to your server.
- A remote console window will open, giving you full keyboard, video, and mouse control over your dedicated server.
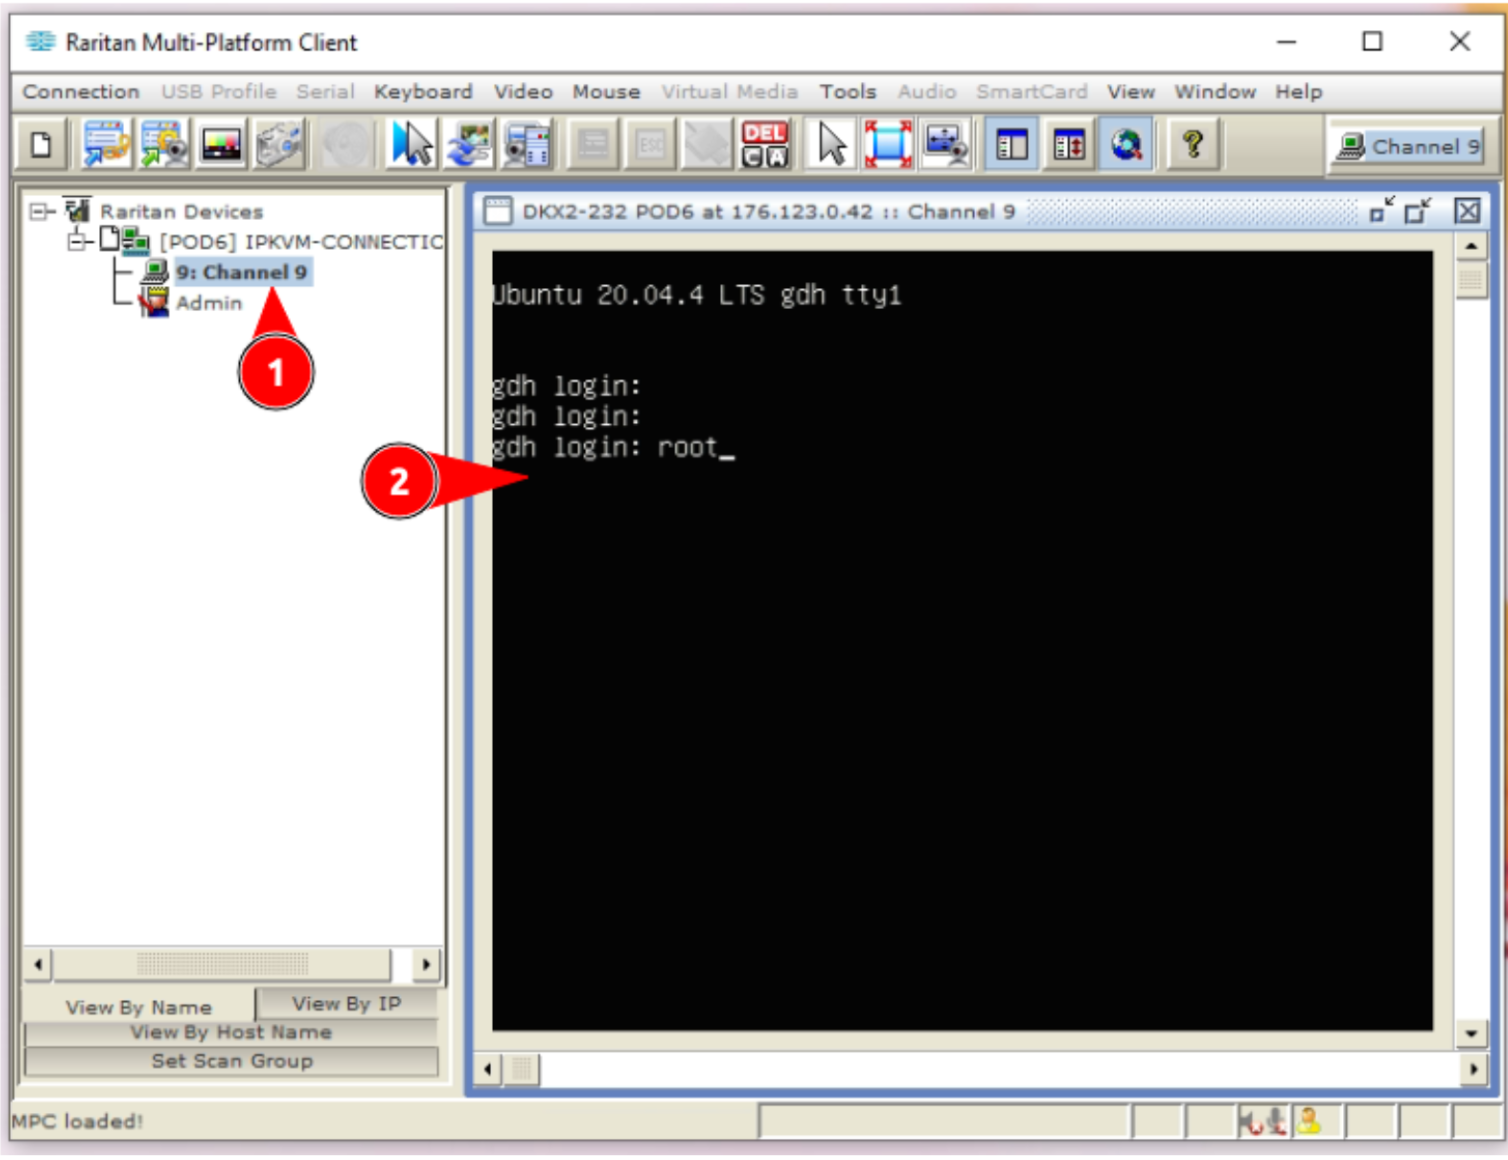
You now have complete, hardware-level access to your server — including BIOS, boot menu, and full OS control.
Troubleshooting Common IPKVM Connection Issues
| Issue | Likely Cause | Solution |
|---|---|---|
| Connection times out | IP not whitelisted | Verify your static IP matches what was submitted in the ticket |
| Java errors on launch | Incorrect JDK version | Ensure JDK 6u45 is installed; newer versions may not be compatible |
| Authentication fails | Wrong credentials | Double-check username/password from your support ticket |
| Black screen in console | Server is powered off | Use IPKVM power controls to power on the server |
| MPC client won't start | Java not detected | Reinstall JDK 6u45 and ensure JAVA_HOME is set correctly |
Why Choose AlexHost for Dedicated Server Management?
AlexHost provides enterprise-grade infrastructure with a strong focus on administrator control and flexibility. IPKVM access is just one component of a comprehensive management ecosystem. Depending on your hosting needs, you may also benefit from:
- VPS Hosting — Scalable virtual private servers with full root access, ideal for businesses that need dedicated resources without the cost of bare-metal hardware.
- VPS with cPanel — Managed VPS environments with the industry-standard cPanel control panel for simplified server administration.
- SSL Certificates — Secure your server's web-facing services with trusted SSL/TLS certificates to protect data in transit.
- Shared Web Hosting — A cost-effective entry point for websites and applications that don't yet require dedicated resources.
Summary
IPKVM is an essential tool for any administrator managing physical dedicated servers in a remote data center. By providing out-of-band, hardware-level access that is completely independent of the server's OS and primary network connection, it eliminates the risk of being permanently locked out of a server due to software failures, misconfigurations, or network outages.
To recap the complete setup process:
- ✅ Open a support ticket and request IPKVM credentials (providing your static IP address)
- ✅ Download and install Java SE Development Kit 6u45
- ✅ Download and install the Raritan MPC Client for Dominion KX II
- ✅ Create a new connection profile with the IP address from your ticket
- ✅ Authenticate with the provided credentials
- ✅ Double-click your server port to begin full remote control
With IPKVM configured, you have the confidence of knowing that no matter what happens to your server's software environment, you always have a reliable path back in.
*Need help getting started? Open a support ticket with the AlexHost team — we're available 24/7 to assist with IPKVM setup and all aspects of your dedicated server management.*