Open Ticket
  +373 79 600002
  Telegram Live Chat
  F.A.Q
F.A.Q  English
 Русский
  Română
  Deutsch
  Français
  Türkçe
  Español
  Português
  Українська
  български
  Polski
  Indonesia
  中文 (中国)




























































































































 on All Hosting Services






N8N AI Agent Tutorial: From Simple Prompt to Structured Workflow Data
Why workflow automation now needs more than fixed rules
Imagine a workflow receives a sentence like this: “A new client named John bought a gpu server on 01/06/2026.” A person reads that and instantly sees three useful values: the customer name, the product, and the date.
A rigid workflow does not. It can split text, search for patterns, and validate formats, but the moment wording changes — “John just ordered a GPU server yesterday” or “New customer John purchased hosting on June 1” — brittle parsing starts to crack.

That’s the boundary between classic automation and the AI layer. Deterministic workflows excel once inputs are clean: routing data, transforming fields, validating records, calling APIs, and repeating sequences reliably. They stumble at the messy first step—interpreting intent, classifying requests, summarizing unstructured content, or extracting fields from natural language before the workflow can act.
That is exactly where an n8n AI Agent becomes practical. In this guide, you will first get a plain-English understanding of what the n8n AI Agent actually is inside a workflow, then build a grounded first use case that turns natural language into structured data.
What an n8n AI Agent actually is
Inside n8n, an AI Agent is best understood as a reasoning step inside a workflow. It is a node that uses a model to interpret input, work with context, and help shape what happens next. That may mean answering a prompt, extracting fields, classifying a request, or deciding how the next workflow step should be prepared. The important part is that the agent lives inside the workflow. It is not the whole system by itself.

The moving parts are easier to understand when you separate them by role:
| Part | What it does |
|---|---|
| 🤖 Chat Model | Provides the language model that generates or structures the response |
| 🧠 Memory | Carries conversation or task context across turns |
| 🛠️ Tools | Let the agent call outside capabilities or data sources |
| 🔗 Regular workflow nodes | Handle triggers, mapping, validation, routing, and downstream actions |
The model handles the flexible interpretation. The surrounding n8n nodes still own the structure: where data comes from, how it is mapped, what gets validated, which node runs next, and what finally gets written to another system. If you need predictable execution, approvals, integrations, or business rules, the workflow remains in charge.
💡 Tip: The cleanest mental model is this: the workflow is still the rails; the agent is the reasoning step inside those rails.
That also makes it easier to say what the n8n AI Agent is not. It is not just a chatbot node. It is not magic autonomy. It is not something every workflow needs. If a fixed rule, a simple transform, or one bounded AI prompt already solves the job, adding an agent layer only adds complexity. The value shows up when the workflow has to deal with ambiguity before it can become deterministic again.
Where n8n AI Agents help most in real workflows
The best place to use an n8n AI Agent is at the edge where human ambiguity enters the system.
- Support teams might need to read an incoming request and classify whether it is billing, technical, or urgent.
- Operations teams might receive internal requests in plain language and need fields pulled out before routing.
- Sales teams may want to turn a messy lead message into clean CRM-ready data.
- Document-heavy workflows might need names, dates, invoice numbers, or service details extracted from unstructured text.
In each of those cases, the division of labor stays the same. The agent interprets, extracts, summarizes, or classifies. The deterministic nodes then validate the output, route it to the right branch, create records, notify people, or write the result into another system. That boundary matters because it keeps the useful part of AI — flexible interpretation — without giving up the predictability that makes workflow automation worth using in the first place.

Structured extraction is a particularly strong first use case because it is bounded, visible, and immediately useful downstream. You can see the input sentence, define the fields you want back, and then use those fields like normal workflow data. That makes the payoff concrete. Instead of “the AI said something helpful,” you get “the workflow now has name, product, and date, and the next node can act on them.”
It is also a good place to keep one discipline in mind: more agent behavior is not automatically better. If a fixed rule or a single prompt already solves the problem, you probably do not need a full agent layer. This article narrows into structured extraction because it shows real workflow value without pretending that every automation problem needs broad autonomy.
What we are building in this tutorial

This tutorial teaches two workflows on purpose. Workflow A is the smallest possible pattern:
Manual Trigger -> Set -> AI Agent -> OpenRouter Chat Model -> plain responseIts job is not to impress you. Its job is to make the data path visible so you can see exactly how the prompt enters the workflow, reaches the agent, and comes back as a normal answer.
Workflow B keeps that same base and upgrades it with a Structured Output Parser plus a Create invoice code node. Instead of returning a paragraph, the agent will return predictable fields. Those fields are then used to build an invoice object, which makes the output immediately useful to the rest of the workflow.
That two-step progression matters. First, you see how the agent behaves in the simplest possible form. Then you see why plain AI output is only half the story for automation. The real payoff comes when the workflow turns natural language into structured data.
Before you start: prerequisites and preparation

Before building the workflow, have three things ready:
- A running n8n instance
- Permission to create and edit a workflow
- Working OpenRouter API credentials
You can run the same logic in n8n Cloud if you want, but this article is framed around a self-hosted environment because that is a common AlexHost-style use case when teams want more control over data, networking, or private integrations.
The practical source for this tutorial was observed on n8n 2.26.8 running on an AlexHost VPS. If you still need to deploy n8n before trying the AI part, use the separate AlexHost guide here: n8n automation tutorial for Ubuntu: from zero to flow.
📓 Note: One small terminology note before you continue: newer documentation may show the Set node as Edit Fields (Set), but this walkthrough keeps the simpler Set wording because that is what the practical source uses.
The reason this article starts with Manual Trigger + Set instead of Chat Trigger is simple: it keeps the input explicit, makes the mapping easy to inspect, and removes one layer of confusion for a first build. You are learning how an AI Agent node fits into a workflow and how that workflow moves from a free-form prompt to structured, automation-ready output.
Hands-on Part 1: build the smallest possible n8n AI Agent flow
This first workflow proves the base pattern before we ask it to do anything more useful. You will create a visible input, pass it into the AI Agent, connect an OpenRouter model, and confirm that the workflow returns a normal text response.
1.0 Add the trigger and input node
Start by placing a Manual Trigger node and a Set node in the canvas. This keeps the entry point simple and gives you one clear field to pass into the agent.
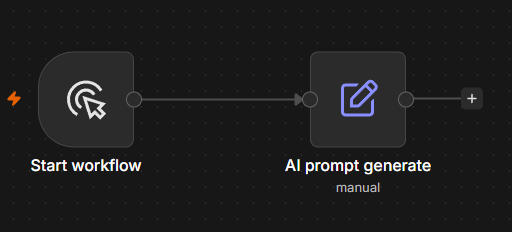
At this point, you are not doing anything “AI-specific” yet. You are preparing clean workflow input so the next node has something explicit to read.
1.1 Configure the Set node
Open the Set node, switch it to Manual Mapping, create a field named prompt, and paste in the starter text below. This gives the workflow one visible value that you can later swap for a more business-like sentence.
Hello, who are you?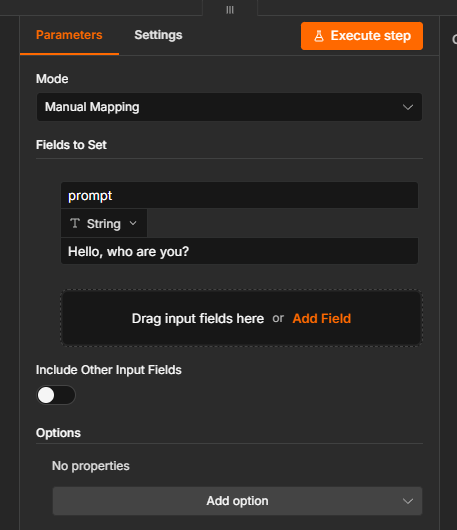
What this does is simple but important: instead of hiding the prompt inside the AI node, you keep it in normal workflow data. That makes the input path easier to understand and reuse.
2.0 Place the AI Agent and connect a chat model
Now add an AI Agent node and connect an OpenRouter Chat Model to its Chat Model input. In beginner terms, the visible inputs mean this: Chat Model is the model the agent uses to respond, Memory is optional context that persists across turns, and Tool is the optional connection that lets the agent call outside capabilities. In this first workflow, only the model is connected because the goal is to understand the smallest working pattern.
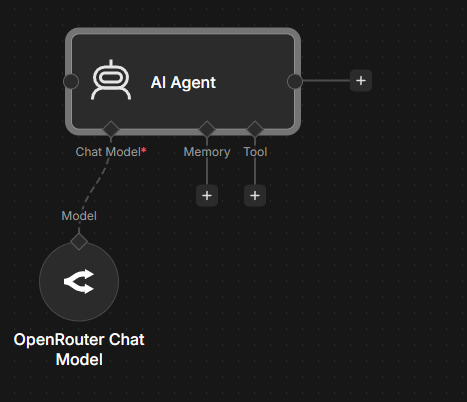
Once this is in place, the role split becomes visible: the workflow carries the input, and the agent will handle the interpretation step.
2.1 Configure the OpenRouter model
Select your OpenRouter account credential and choose the same model shown in the source workflow: deepseek/deepseek-v4-flash. You do not need extra tuning for this first pass.
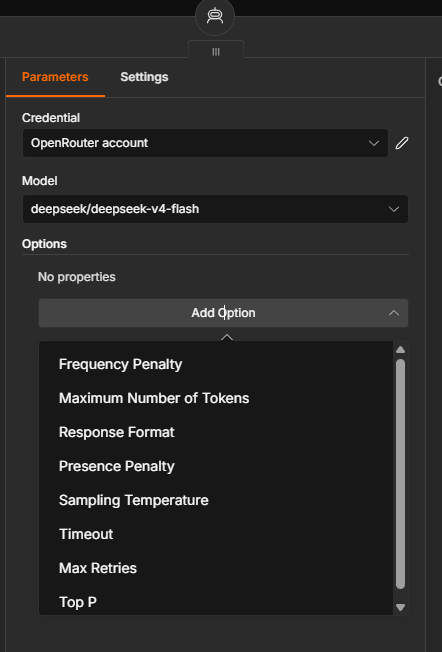
📝 Note: Available OpenRouter models can vary by account, even though the source-of-truth example here uses deepseek/deepseek-v4-flash.
If your account shows a different list, the workflow pattern still matters more than the exact model name.
3.0 Map the prompt field into the AI Agent
Connect the Set node output to the AI Agent, set Source for Prompt (User Message) to Define below, and map the workflow value into the prompt field using the expression below. This tells the agent to read the prompt value from upstream data instead of using a hardcoded message inside the node.
{{ $json.prompt }}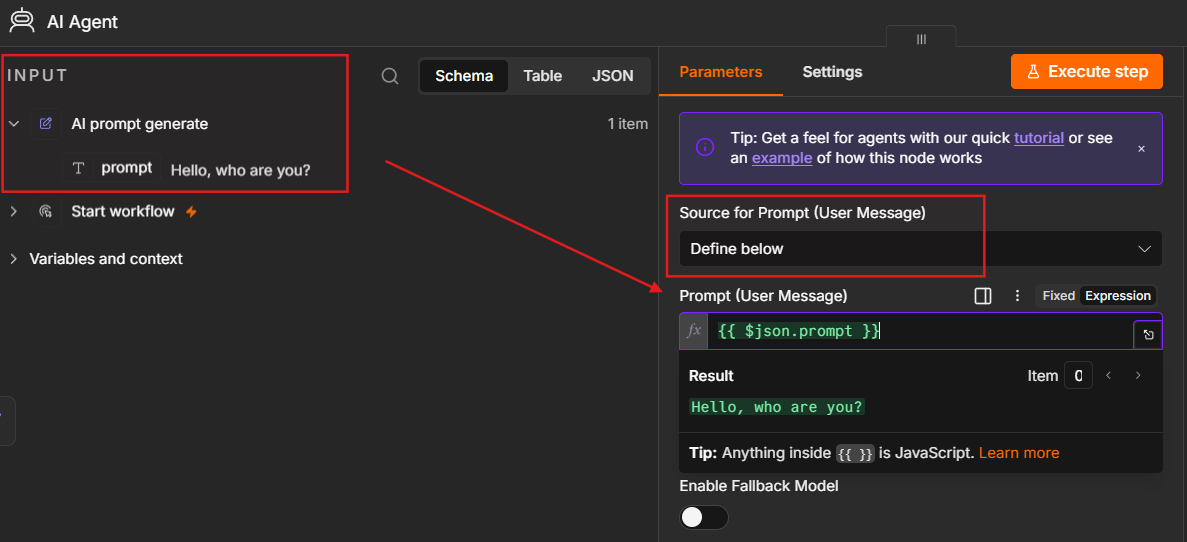
That mapping is the key bridge between normal n8n data and the AI step. Once it clicks, the rest of the tutorial becomes much easier to follow.
3.1 Execute the workflow
Run the workflow so the data moves through the full chain: Manual Trigger -> Set -> AI Agent -> OpenRouter Chat Model. You are verifying not just that the model responds, but that the workflow passes the prompt cleanly from one node to the next.
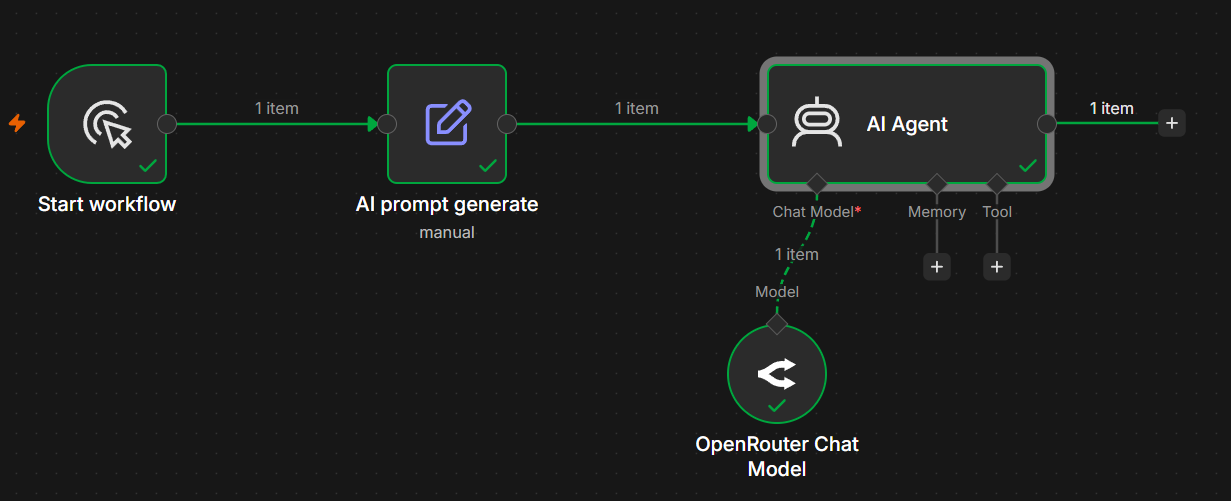
If the execution succeeds, you now have proof that the agent can consume workflow data rather than only free-typing inside its own interface.
3.2 Review the response
Open the output and inspect the result. At this stage, the AI Agent returns a normal text answer to the prompt. That is the basic pattern in its simplest form: prompt in, response out.
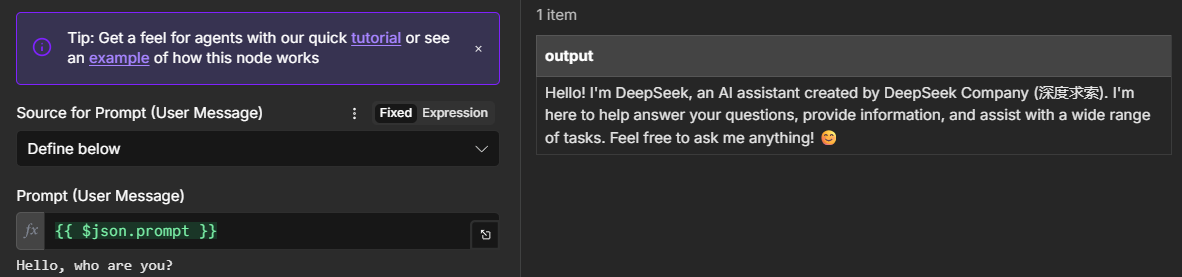
That first workflow matters because it proves the plumbing. It also shows the limitation clearly: a paragraph is fine for interaction, but awkward for downstream automation. The next step is where the workflow becomes much more useful.
Hands-on Part 2: turn the response into structured workflow data
Now we keep the same base workflow and change the goal. Instead of asking the agent for a general reply, we will ask it to extract predictable fields that the next node can use like normal JSON.
4.0 Change the prompt and require a specific format
Go back to the Set node and replace the casual greeting with the business-style sentence below. Then enable Require Specific Output Format in the AI Agent so the workflow stops aiming for prose and starts aiming for structured extraction.
A new client named John bought a gpu server on 01/06/2026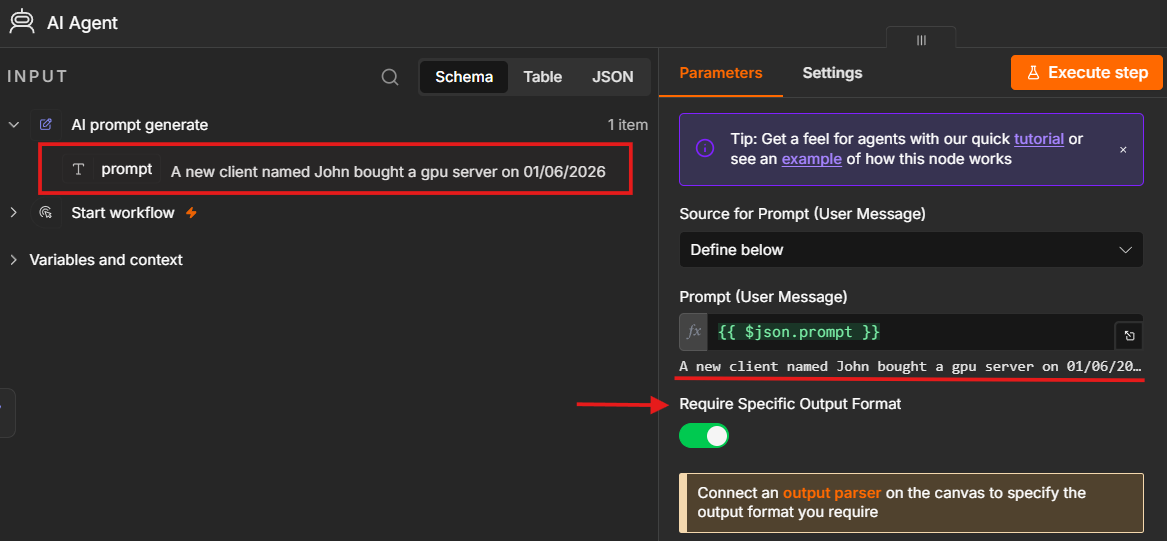
This is the moment the use case becomes real. The sentence contains data a human understands instantly, and the workflow is now being taught to return that data in a machine-usable shape.
4.1 Add a Structured Output Parser
Connect a Structured Output Parser to the AI Agent’s Output Parser input. This parser is what gives the model a target structure instead of letting it answer in free text.
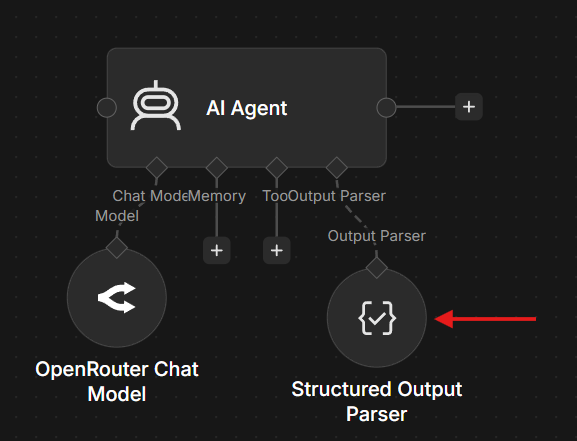
📝 Note: The Structured Output Parser is a good fit for this first demo, but official n8n guidance notes that direct parsing on agents can be less reliable in more advanced workflows. For this beginner pattern, it is still the right teaching step because it makes the data-shape change easy to see.
The important idea is not the extra node by itself. It is that you are turning “AI response” into “workflow contract.”
4.2 Define the output schema from a JSON example
In the parser, set Schema Type to Generate From JSON Example and use the exact example below. This gives the agent a clear schema with the three fields the workflow expects back.
{
  "name": "Alex",
  "product": "VPS hosting",
  "date": "21/6/2026"
}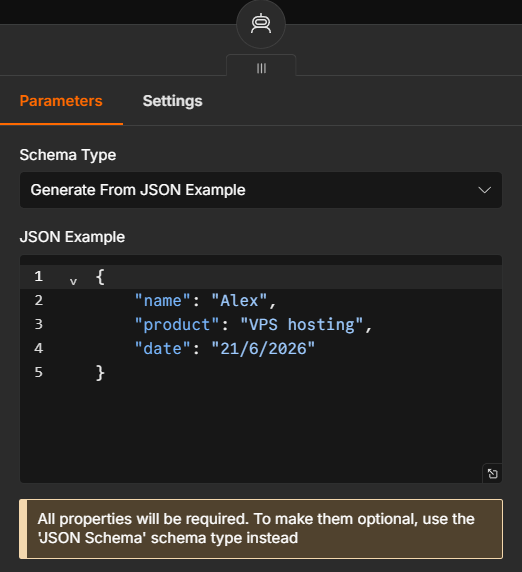
Once you define that example, you are no longer asking the model to “say something useful.” You are asking it to return a predictable structure with name, product, and date.
4.3 Check the structured result
Execute the workflow again and inspect the AI Agent output. This time, the result should come back as fields instead of a paragraph.
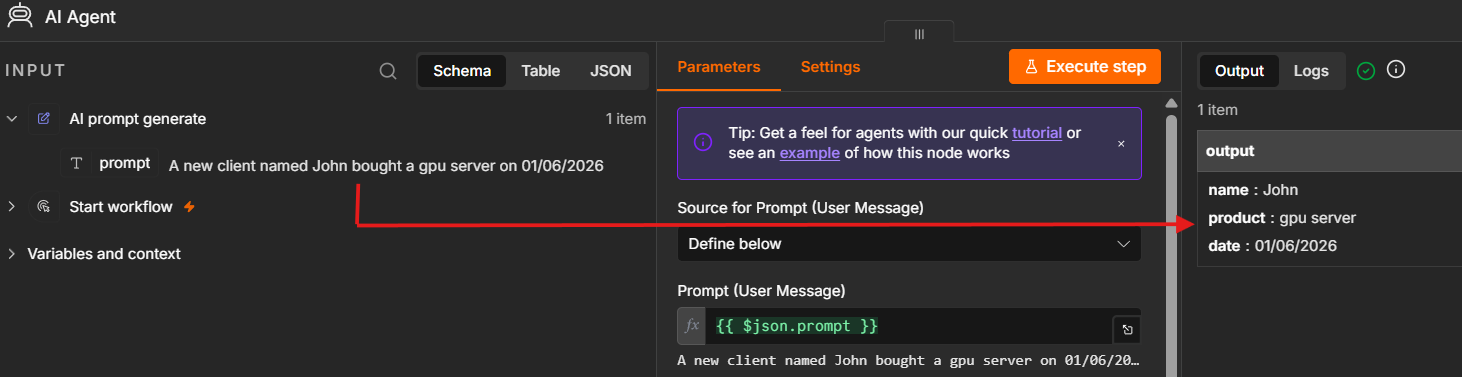
That shape change is the real upgrade. Structured output is not just prettier formatting. It is what makes the result reliable enough for downstream logic to consume without guessing.
4.4 Use the parsed fields in a JavaScript invoice node
Now pass the result into a Create invoice JavaScript node. The key source-of-truth detail in this walkthrough is that the parsed object is read from $input.first().json.output, which means the code is consuming the structured agent output directly.
// Input data
const order = $input.first().json.output

// Parse the order date
const [day, month, year] = order.date.split("/");
const orderDate = new Date(`${year}-${month}-${day}`);

// Generate a pseudo unique invoice ID (8 chars)
function generateId() {
  return Math.random().toString(36).substring(2, 10);
}
const invoiceId = generateId();

// Calculate payment due date (7 days later)
const dueDate = new Date(orderDate);
dueDate.setDate(orderDate.getDate() + 7);

// Build invoice record
const invoice = {
  invoice_id: invoiceId,
  customer: order.name,
  product: order.product,
  order_date: orderDate.toISOString().split("T")[0],
  due_date: dueDate.toISOString().split("T")[0],
  status: "Pending"
};

// Print invoice
console.log("Invoice Generated:");
for (const [key, value] of Object.entries(invoice)) {
  console.log(`${key}: ${value}`);
}

// If inside n8n Function node, return JSON
return [{ json: invoice }];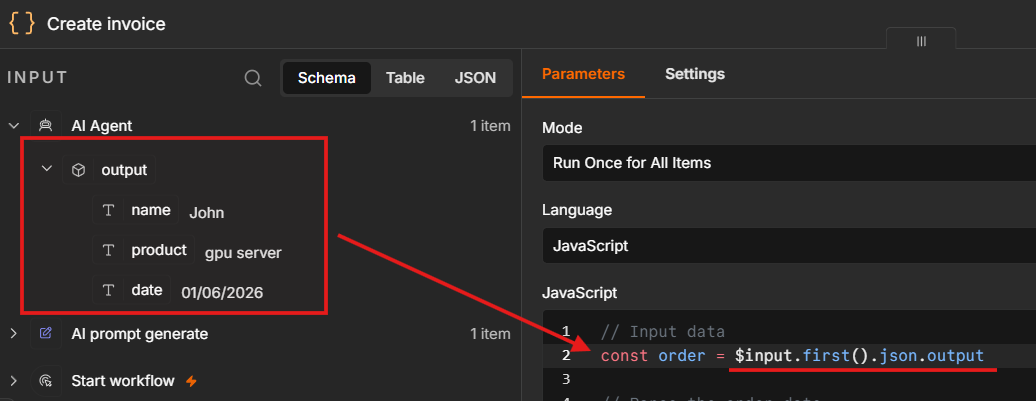
This is where the workflow stops behaving like a chat demo and starts behaving like automation. The agent extracted the fields, and the next node used them exactly like any other structured input.
4.5 Review the generated invoice data
Open the final output and inspect the invoice object. You should see usable fields such as invoice_id, customer, product, order_date, due_date, and status.
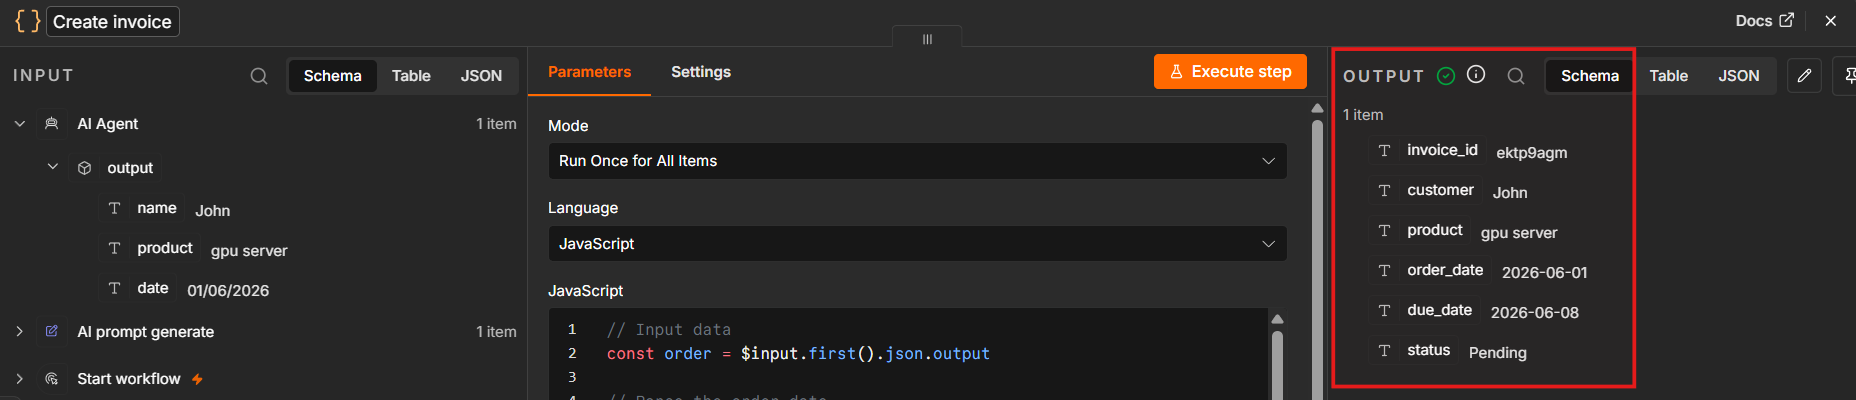
That is the full lifecycle the article has been building toward: natural language sentence -> structured extraction -> invoice record. Once the result has that shape, the workflow can pass it into later steps just as reliably as any other JSON payload.
What these first two workflows actually prove

Taken together, the two workflows show two different patterns for the n8n AI Agent. The first pattern is plain prompt-response: the agent receives text and answers with text. The second pattern is structured extraction: the agent receives messy human language and returns fields the workflow can actually use.
That difference matters because the upgrade is about capability, not cosmetics. Text generation helps with interaction. Structured extraction helps with automation. The second pattern is what turns the AI step from “interesting” into operationally useful.
The table below summarizes that shift:
| Pattern | What the agent did | What the workflow can do next |
|---|---|---|
| Plain prompt-response | Read a visible prompt and return a normal text answer | Display the answer, review it, or use it for light human-facing interaction |
| Structured extraction | Read a sentence and return predictable fields such as name, product, and date | Validate values, create records, branch logic, notify systems, or pass JSON to later nodes |
Once you understand that upgrade path, the invoice example stops being “an invoice tutorial” and becomes a reusable workflow pattern. The same approach can power lead capture, support intake, order parsing, ticket enrichment, or internal request routing. In each case, the goal is the same: turn natural language into structured data, then let deterministic workflow nodes do the rest.
What to try next after this first use case

The safest step isn’t autonomy—it’s keeping the bounded pattern and upgrading one variable at a time. Swap Manual Trigger for a Chat Trigger or Webhook when you need inbound input. Add memory only when continuity matters. Attach tools only when the agent must look something up or act beyond the node. Then add validation or approval if outputs touch real systems.
Self‑hosting becomes critical when workflows need private inputs, internal service access, predictable uptime, or tighter control—here AlexHost‑style VPS infrastructure is part of the design, not just background. For deployment, the same AlexHost guide covers setup: n8n automation tutorial for Ubuntu: from zero to flow.
📝 Note: The guiding rule: smallest‑system heuristic. If structured extraction solves the problem, stop there. Don’t add memory, tools, or autonomy unless the workflow truly requires them.
Start with a bounded use case, not autonomy hype

Rigid automation usually breaks first at the moment messy human input enters the system. That is the gap this article focused on. You now have both the mental model and a working pattern: the n8n AI Agent handles the flexible interpretation step, and the surrounding workflow turns that result into something structured and dependable.
That is the design rule worth keeping. Start with controlled interpretation tasks that produce workflow-ready data. Expand into memory, tools, or richer triggers only when the real workflow needs them — not because the word “agent” makes bigger autonomy sound more impressive.