How to Create SSH Keys with OpenSSH on MacOS or Linux ⋆ ALexHost SRL

Test your skills on our all Hosting services and get 15% off!

Use code at checkout:

Skills
21.10.2024
No categories

How to Create SSH Keys with OpenSSH on MacOS or Linux

How to Create SSH Keys with OpenSSH on macOS or Linux

In the world of secure remote communication, SSH (Secure Shell) is one of the most commonly used protocols for connecting to remote servers. SSH provides a secure method of logging into remote machines and executing commands over a network. One of the most secure ways to authenticate using SSH is with SSH keys, which allow for passwordless authentication and add an extra layer of security. SSH keys come in pairs: a private key and a public key. In this article, we’ll walk through the steps to create SSH keys using OpenSSH on macOS or Linux.

What Are SSH Keys?

SSH keys are a pair of cryptographic keys used to authenticate a client (your computer) to an SSH server. The public key is placed on the server, and the private key is kept on the client machine. When you attempt to log in, the server checks the public key against the private key to verify your identity. Unlike passwords, SSH keys are not vulnerable to brute force attacks, making them a highly secure authentication method.

Why Use SSH Keys?

  • Enhanced Security: SSH keys are harder to crack than traditional passwords, reducing the risk of unauthorized access.
  • Passwordless Authentication: Once set up, SSH keys allow you to log into servers without entering a password every time.
  • Automated Processes: SSH keys are ideal for automating scripts, backups, and file transfers that require secure remote access.

Prerequisites

To follow this guide, you’ll need:

  1. A macOS or Linux machine with OpenSSH installed (OpenSSH is included by default on both platforms).
  2. Access to a remote server where you’ll place the public key.

Step-by-Step Guide to Creating SSH Keys

Step 1: Open a Terminal

On both macOS and Linux, the Terminal app provides the interface for running command-line commands. Open the Terminal by:

  • macOS: Search for “Terminal” in Spotlight (press Cmd + Space) or find it under Applications > Utilities.
  • Linux: Press Ctrl + Alt + T, or look for Terminal in your application menu.

Step 2: Generate the SSH Key Pair

To generate a new SSH key pair, use the following command in the terminal:

ssh-keygen -t rsa -b 4096 -C "your_email@example.com"

Explanation of the options:

  • -t rsa: Specifies the type of key to create. RSA is one of the most commonly used algorithms.
  • -b 4096: Sets the key length to 4096 bits for stronger security.
  • -C “your_email@example.com”: This adds a comment to the key, typically used to identify the key. Replace it with your email or a descriptive name.

Once you run this command, you’ll see output similar to:

Generating public/private rsa key pair.
Enter file in which to save the key (/home/yourusername/.ssh/id_rsa):

Step 3: Choose a File Location (Optional)

By default, the key will be saved in the .ssh directory in your home folder as id_rsa (private key) and id_rsa.pub (public key). Press Enter to confirm the default location, or you can specify a different path.

Example:

Enter file in which to save the key (/Users/yourusername/.ssh/id_rsa): [Press Enter]

Step 4: Set a Passphrase (Optional but Recommended)

Next, you’ll be asked to set a passphrase for your key:

Enter passphrase (empty for no passphrase):

A passphrase provides an additional layer of security by requiring you to enter it each time you use your private key. You can leave this blank if you prefer not to use a passphrase (though it’s recommended for enhanced security).

If you do set a passphrase, make sure it’s something you can remember or store securely.

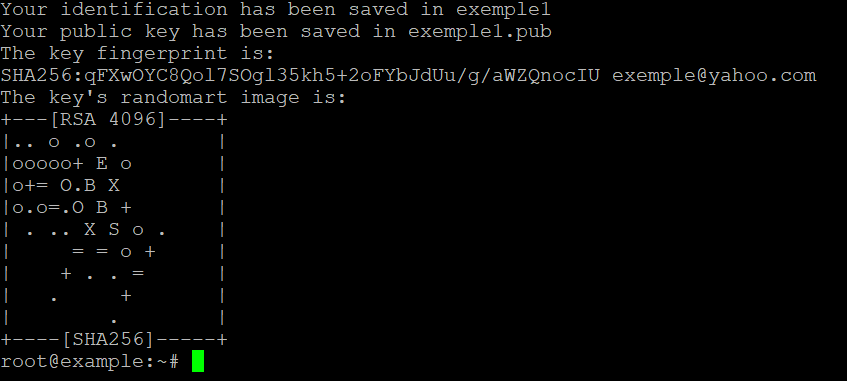
Step 5: Confirm the Creation of the Key Pair

After completing the steps, you will see output similar to:


This indicates that both the private key (id_rsa) and public key (id_rsa.pub) have been successfully created and stored in the .ssh directory.

Step 6: Copy the Public Key to the Server

Now that you have generated your SSH key pair, you need to copy the public key to the remote server where you want to log in.

You can use the ssh-copy-id command to automate this process:

ssh-copy-id user@your-server.com

Replace user@your-server.com with your actual username and server address. You’ll be prompted to enter your password for the remote server.

Alternatively, if ssh-copy-id isn’t available, you can manually copy the public key:

  1. Display the contents of your public key by running:
    cat ~/.ssh/id_rsa.pub
  2. Copy the output and paste it into the .ssh/authorized_keys file on the remote server. You can do this by logging into the server:
    ssh user@your-server.com

    Then, create the .ssh directory (if it doesn’t exist) and add the key:

    mkdir -p ~/.ssh
    echo "your-copied-public-key" >> ~/.ssh/authorized_keys
    chmod 600 ~/.ssh/authorized_keys

Step 7: Test the SSH Connection

Once the public key is copied to the remote server, you can test the connection:

ssh user@your-server.com

If everything is set up correctly, you should be able to log in without entering a password (unless you set a passphrase for your key, in which case you’ll need to enter it).

Managing SSH Keys

  • List all keys: If you have multiple keys, you can list them by navigating to the .ssh directory:
    ls ~/.ssh
  • Add keys to SSH agent: If you want to avoid entering the passphrase repeatedly, you can add your key to the SSH agent:
    eval "$(ssh-agent -s)"
    ssh-add ~/.ssh/id_rsa

Conclusion

Creating SSH keys with OpenSSH on macOS or Linux is a straightforward process that greatly improves the security of remote server connections. By following the steps outlined in this guide, you can generate a key pair and set up passwordless authentication, making it easier to securely manage remote machines. SSH keys are an essential tool for any developer, system administrator, or anyone who frequently works with remote servers.

Test your skills on our all Hosting services and get 15% off!

Use code at checkout:

Skills