 English
 Русский
  Română
  Deutsch
  Français
  Türkçe
  Español
  Português
  Українська
  български
  Polski
  Indonesia
  中文 (中国)


How to Upload Your Own ISO Image via IPKVM Access on AlexHost Dedicated Servers
When managing powerful dedicated servers, having full control over your operating system installation and hardware management tools is essential. At AlexHost, we provide our clients with IPKVM (IP-based Keyboard, Video, and Mouse) access for all dedicated servers — including full BIOS-level control and the ability to upload and install a custom ISO image of your choice.
While IPKVM is available on every AlexHost server, this guide focuses specifically on configurations based on dual-CPU (2xCPU) platforms, where this functionality is most frequently used for complex virtualization environments, custom hypervisors, or advanced OS deployment tasks.
What Is an ISO Image?
An ISO image is a single file that represents an entire optical disc — most often a bootable installation medium such as an operating system installer (Linux, Windows, or BSD).
It contains all the files, folders, and boot data necessary to install or run a system, making it an ideal format for remote installations and custom deployments.
System administrators and developers use ISO images to:
- Install a custom OS or hypervisor (e.g., Proxmox, VMware ESXi, or FreeBSD);
- Deploy preconfigured environments for testing or production;
- Create consistent system installations across multiple servers;
- Reinstall the operating system without physical access to the hardware.
What Is IPKVM Access?
IPKVM (Internet Protocol Keyboard, Video, Mouse) access is a remote hardware management interface that allows you to interact directly with your dedicated server — as if you were physically sitting in front of it.
With IPKVM, you can:
- View the live screen output of your server in real time;
- Access the BIOS and modify low-level hardware settings;
- Mount an ISO image directly from your local computer or a remote URL;
- Reinstall or recover the operating system without relying on network-based tools;
- Manage the server even when the network configuration or OS is not operational.
Essentially, IPKVM bridges the gap between physical and remote access, providing out-of-band control of your dedicated hardware.
Pricing and Availability
IPKVM access is included as an optional paid feature for AlexHost dedicated servers at a cost of €10.
Once enabled, you will receive your unique access credentials, allowing you to connect securely to the IPKVM interface directly from your client area or through the provided link.
This feature provides:
- Full BIOS-level access
- Custom ISO mounting capability
- Remote installation and reinstallation options
- Complete control during system setup and recovery
All dual-CPU servers include automatic IPKVM provisioning, ensuring that you can begin your ISO-based installation process almost immediately after activation.
How It Works — The Concept
When IPKVM access is activated for your server, you gain direct communication with the baseboard management controller (BMC) — the dedicated chip responsible for remote administration.
Through the web-based KVM console, you can mount an ISO file from your local machine, network share, or remote URL.
Once mounted, the server treats this ISO as if a physical disc were inserted into a local drive, allowing you to boot from it and perform any standard installation procedure.
This approach provides complete flexibility and independence from AlexHost’s automated installation templates, giving you total freedom over your system setup.
For our HP platforms, specifically servers equipped with dual CPUs such as 2x Intel® Xeon® E5-2680 v2, 2x Intel® Xeon® E5-2690 v2, 2x Intel® Xeon® E5-2620 v3, 2x Intel® Xeon® E5-2699 v3, and 2x Intel® Xeon® E5-2690 v4, the process begins by accessing the Remote Console provided in your AlexHost client area. This interface allows you to control the server at the BIOS level and mount ISO images as virtual media. Once you open the Remote Console, select the HTML5 Console option and launch it in your browser. The HTML5 interface provides a seamless and platform-independent experience, eliminating the need for Java or other plugins, while giving you real-time keyboard, video, and mouse control over your server.
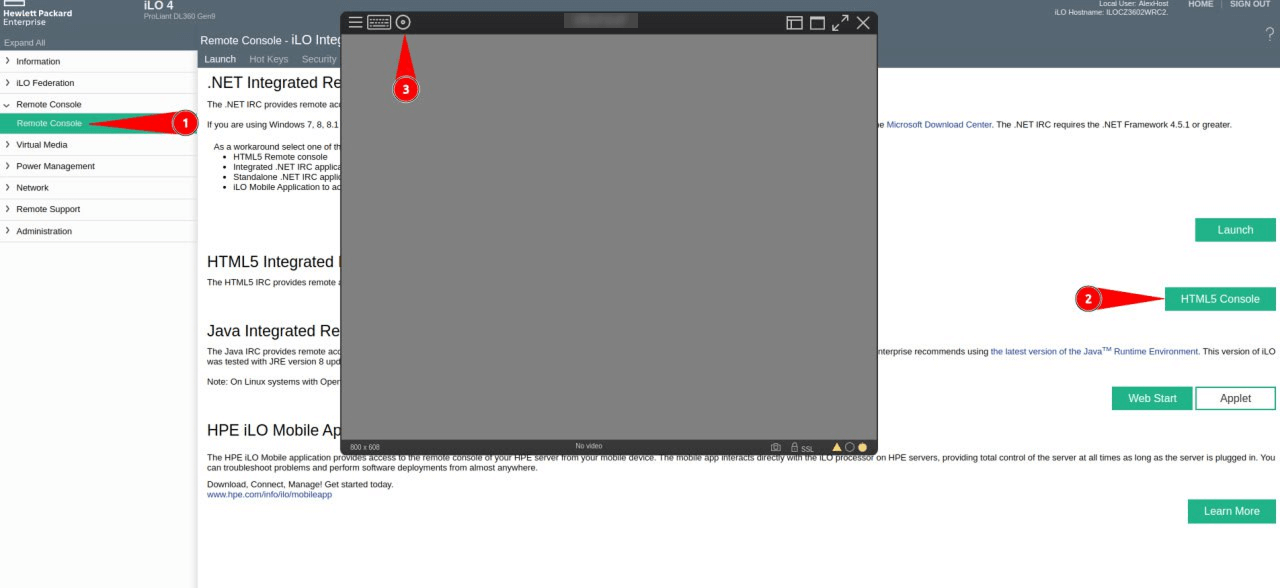
After launching the HTML5 console, you gain the ability to mount your ISO image directly from your local machine or a network location. From this point, the server treats the ISO as if it were a physical disc inserted locally, allowing you to begin installation, reinstallation, or any necessary system recovery tasks — all under your full control.

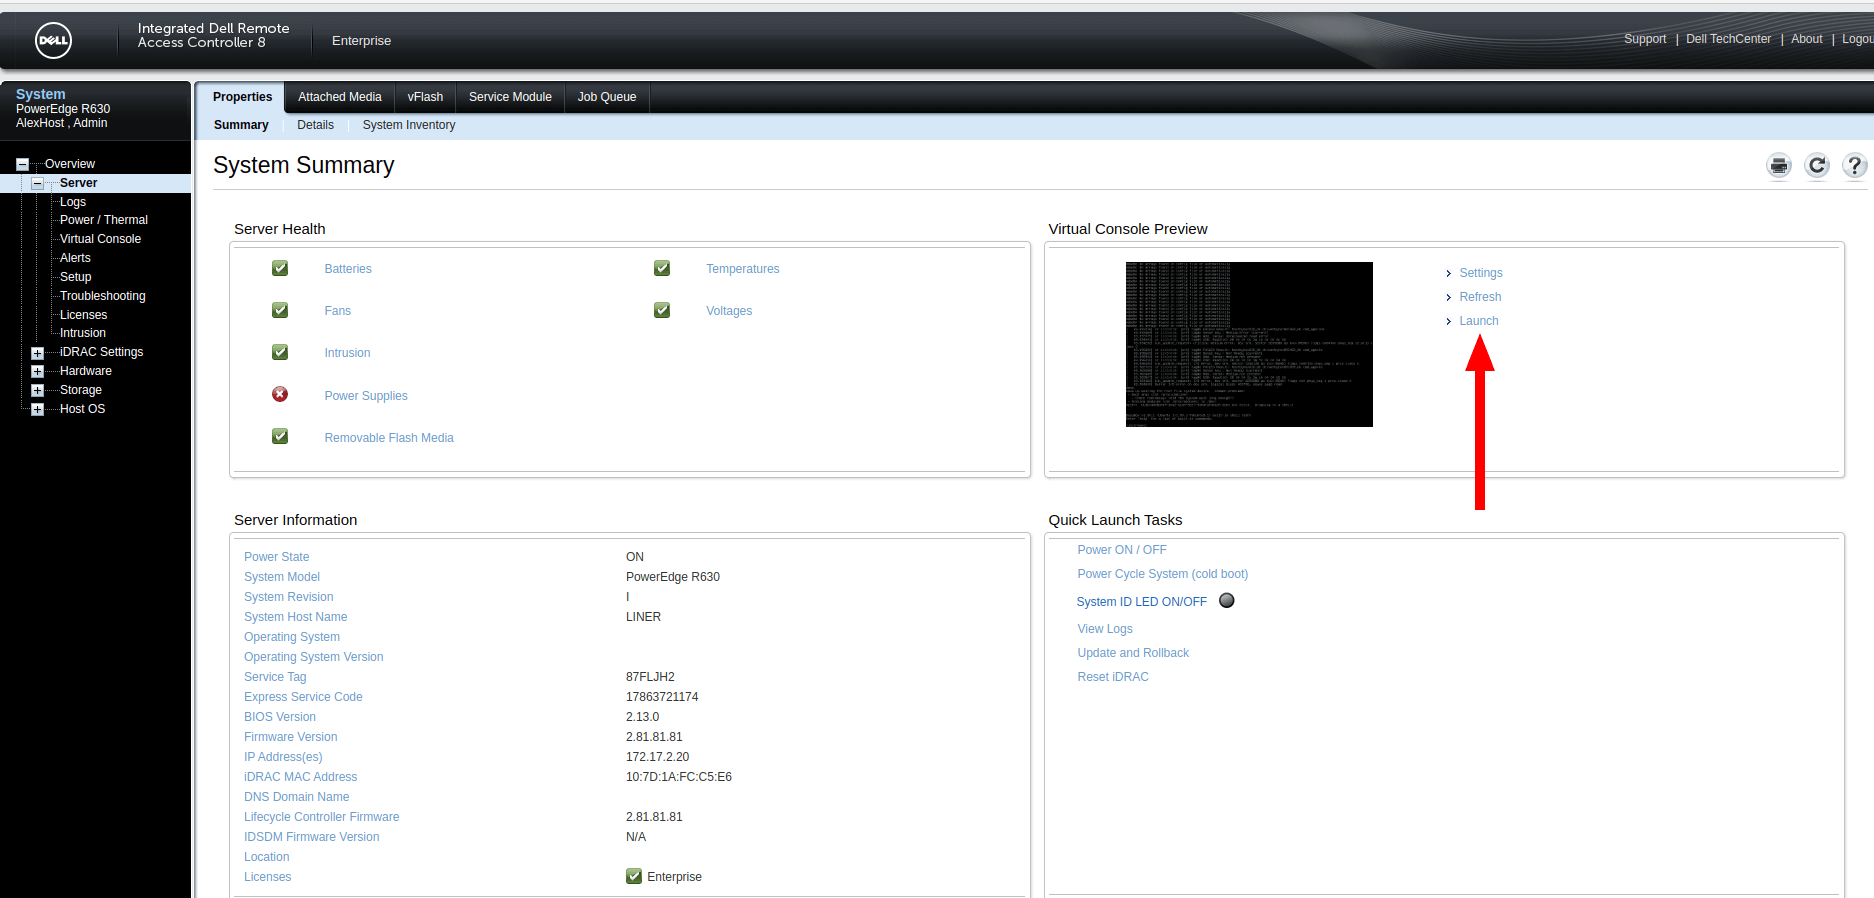
Here’s how the process works for our DELL-based dedicated platforms, which are equipped with high-performance dual-CPU configurations such as 2x Intel® Xeon® E5-2680 v2, 2x Intel® Xeon® E5-2690 v2, 2x Intel® Xeon® E5-2620 v3, 2x Intel® Xeon® E5-2699 v3, and 2x Intel® Xeon® E5-2690 v4. These servers are designed for demanding workloads, virtualization, or large-scale hosting projects, and all of them come with full IPKVM access for remote control and custom OS installation.
To begin, you’ll need to open the IPKVM panel associated with your dedicated server. This panel gives you direct access to the server’s hardware-level interface, similar to being physically in front of the machine. Inside the panel, click Launch to start the remote console. Once the console window opens, you’ll gain full control — you can monitor the boot process, access the BIOS, or install any custom operating system.
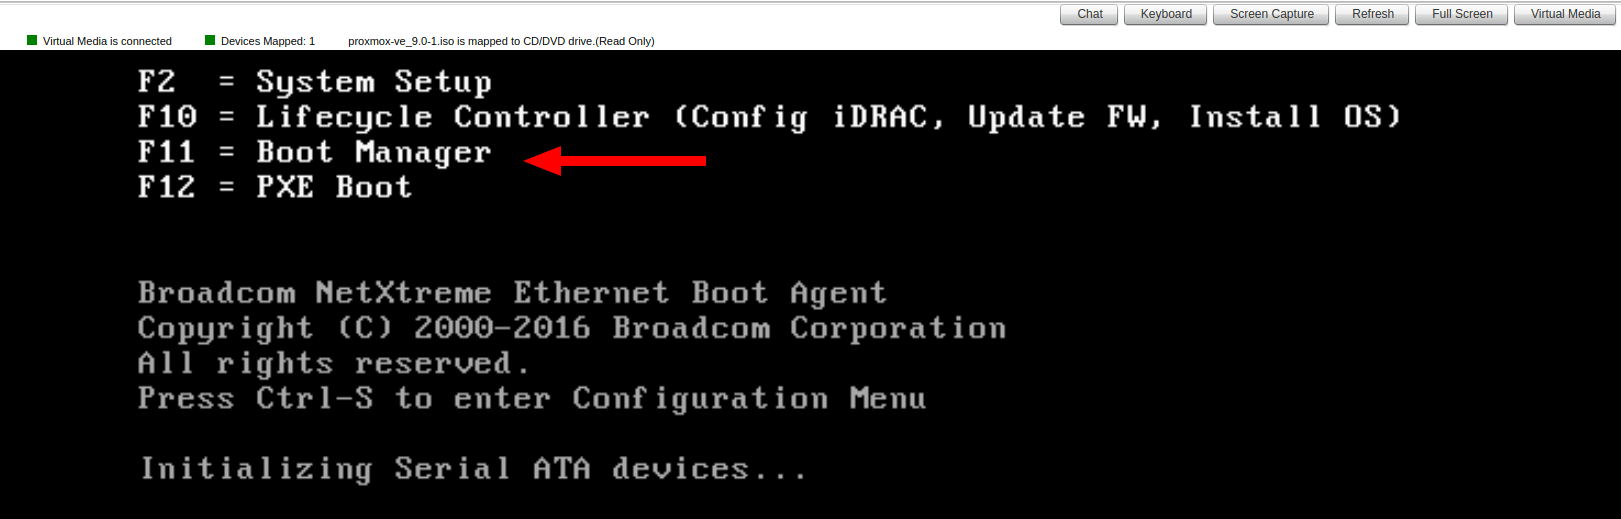
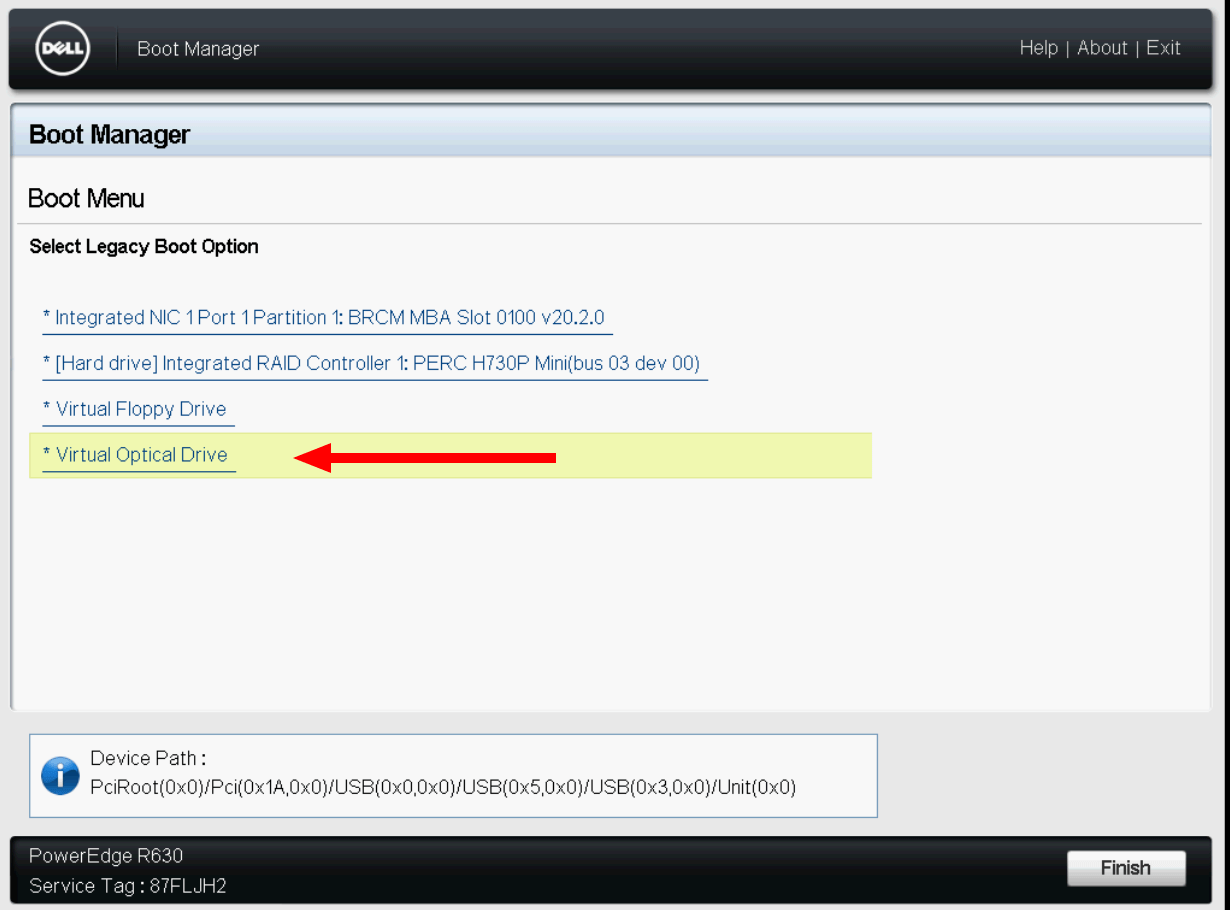
Next, go to the Virtual Media section, select “Choose File”, and upload your ISO image. This ISO file will be mounted as a virtual drive on the server, making it available for boot. After successfully attaching the image, press F11 during the boot sequence (as illustrated in the next step of this guide) to enter the Boot Manager.

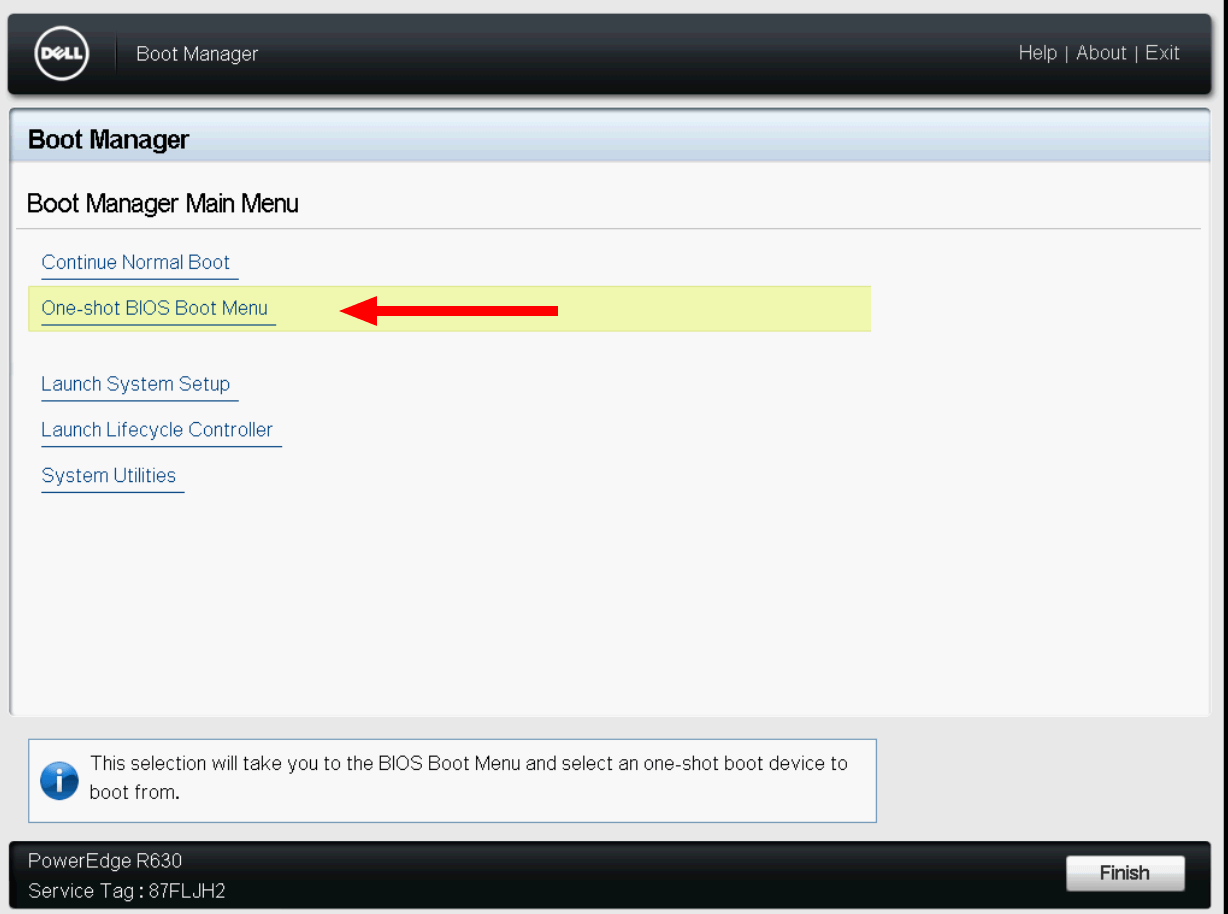
From there, choose One-Shot BIOS Boot Menu — this allows you to select the specific device to boot from for the current session. In the list of available boot options, select the virtual drive containing your uploaded ISO. Once confirmed, the server will immediately boot from that image, enabling you to begin installing or configuring your preferred operating system directly through the IPKVM interface.
This method provides full flexibility for system administrators who prefer to deploy custom environments, perform manual OS setups, or use specialized distributions not available in the automatic installation list.