


How to Install OpenJDK on Ubuntu 22.04
Install OpenJDK on Ubuntu 22.04 for Java Development on AlexHost VPS
Why install OpenJDK on AlexHost? OpenJDK is a free, open-source Java SE implementation for building and running Java apps. AlexHost’s Ubuntu VPS with NVMe storage, LiteSpeed, root access, and DDoS protection provides a fast, secure platform for Java development. This guide covers installing OpenJDK on Ubuntu 22.04, verification, and configuration on AlexHost.
Telegram Premium Account Giveaway
Join Now 


Step 1: Update and Upgrade Your System
Before installing any new software, it’s a good idea to update the package lists and upgrade existing packages to their latest versions. Open a terminal and run the following commands:
sudo apt update
 sudo apt upgrade
This ensures that your system is up to date and any potential package conflicts are avoided.
Step 2: Check Available Versions of OpenJDK
Ubuntu repositories contain several versions of OpenJDK, such as OpenJDK 11 and OpenJDK 17. To see which versions are available in the repository, use the following command:
sudo apt search openjdk
This will list all the available OpenJDK versions that can be installed.
Step 3: Install OpenJDK
To install a specific version of OpenJDK, for instance, OpenJDK 11 or OpenJDK 17, follow these steps:
- To Install OpenJDK 11 (LTS version):
sudo apt install openjdk-11-jdk
- To Install OpenJDK 17 (the latest LTS version as of Ubuntu 22.04):
sudo apt install openjdk-17-jdk
The openjdk-*-jdk package includes both the Java Development Kit (JDK) and Java Runtime Environment (JRE). If you only need the runtime environment, you can install the openjdk-*-jre package.
Step 4: Verify the Installation
Once the installation is complete, you should verify the version of Java installed on your system. You can check this by running the following command:
java -version

This command should display the installed version of OpenJDK.
Step 5: Configure Default Java Version
If multiple versions of Java are installed, you can configure the default version by using the update-alternatives tool. Run the following command:
sudo update-alternatives --config java
This will display a list of all installed Java versions. You can choose the default version by entering the corresponding number.
Step 6: Set JAVA_HOME Environment Variable
It’s often necessary to set the JAVA_HOME environment variable for Java-based applications to function properly. You can set this by editing the ~/.bashrc file or /etc/environment for system-wide configuration.
To set JAVA_HOME for the current user, follow these steps:
- Open the .bashrc file for editing:
nano ~/.bashrc

- Add the following line at the end of the file (replace <version> with the installed version, for example, 11 or 17):
export JAVA_HOME=/usr/lib/jvm/java-<version>-openjdk-amd64
- Save the file and apply the changes:
source ~/.bashrc
- Verify that JAVA_HOME is set correctly:
echo $JAVA_HOME

You should see the path to your installed OpenJDK version.
Step 7: Test Java Installation
To ensure that Java is properly installed and set up, create a simple Java program and run it:
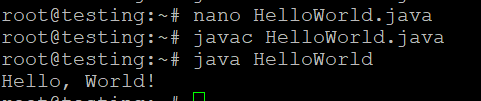
- Create a file called HelloWorld.java:
nano HelloWorld.java
- Add the following Java code:
public class HelloWorld {
 public static void main(String[] args) {
 System.out.println("Hello, World!");
 }
}- Compile the program using javac (Java compiler):
javac HelloWorld.java
- Run the program:
java HelloWorld
If everything is installed correctly, you should see the output:
Conclusion: Install and Optimize OpenJDK on Ubuntu 22.04 with AlexHost VPS
OpenJDK provides a robust Java environment for development. On AlexHost’s VPS, leverage NVMe for fast compilation and DDoS protection for security. Install, configure, and test OpenJDK today for efficient Java apps!